و 0xc000000e خطأ عند محاولة تشغيل النوافذ الوسائل التي كنت تتعامل مع تلف بيانات تكوين التمهيد. بيانات تكوين التمهيد هي متجر عالمي لجميع الخيارات والإعدادات المتعلقة بالتمهيد على أجهزة كمبيوتر Windows الأحدث.
ستحصل على هذا الخطأ عند محاولة تشغيل جهازك ، وستظهر لك شاشة سوداء تعطيك إرشادات حول كيفية إصلاح جهاز الكمبيوتر الخاص بك باستخدام قرص التثبيت أو محرك الاسترداد. لسوء الحظ ، فإن وجود محرك الاسترداد هذا هو الطريقة الوحيدة لحل هذه المشكلة ، لذلك يجب أن تضع يديك على أحدها قبل البدء. إذا لم يكن لديك ، فمن السهل إلى حد ما إنشاء واحد باستخدام أداة Rufus أو Windows Media Creation من أي جهاز كمبيوتر آخر أو كمبيوتر محمول.

ستحتاج أيضًا إلى التمهيد في BIOS لتغيير ترتيب التمهيد وجعل جهاز الكمبيوتر الخاص بك يقوم بالتمهيد من محرك الاسترداد بدلاً من محرك الأقراص الثابتة. للقيام بذلك ، اتبع الخطوات التالية:
- أدخل إعدادات BIOS أو UEFI بالضغط على المفتاح المخصص من الشركة المصنعة للوحة الأم قبل بدء تشغيل Windows. عادةً ما يكون هذا المفتاح هو Esc أو Delete أو F2 أو F8 أو F10 أو F12 أو Backspace ، اعتمادًا على الشركة المصنعة. يمكنك إجراء بحث عبر الإنترنت حول كيفية إدخال BIOS ، متبوعًا بطراز الكمبيوتر الخاص بك.
- بمجرد الدخول ، انتقل إلى Boot استخدم الإرشادات الموجودة في BIOS لتغيير ترتيب التمهيد ، واضبط إما القرص المضغوط أو منفذ USB ليكون الجهاز الأول ، اعتمادًا على ما إذا كان محرك الاسترداد هو قرص مضغوط أو محرك أقراص محمول .
- احفظ إعداداتك واخرج.

الطريقة الأولى: إعادة إنشاء بيانات تكوين التمهيد
للقيام بذلك ، ستحتاج إلى تمهيد جهاز الكمبيوتر الخاص بك من محرك الاسترداد. إذا قمت بتكوين BIOS الخاص بك من خلال الخطوات المذكورة أعلاه ، فيمكنك القيام بذلك عن طريق الضغط على أي مفتاح بمجرد ظهور المطالبة على الشاشة. بمجرد تمهيد الكمبيوتر من محرك الاسترداد ، استخدم الخطوات التالية لإعادة إنشاء BCD:
- في مربع الحوار إعداد Windows ، اضبط كل شيء على القيم المناسبة ، وحدد لغتك وانقر
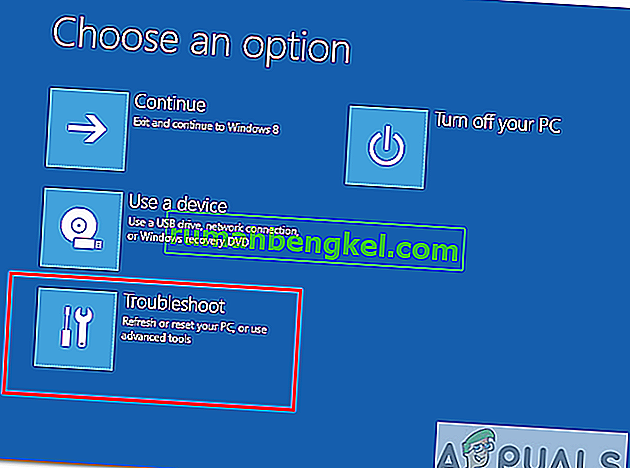
- في الزاوية السفلية اليسرى ، انقر فوق إصلاح جهاز الكمبيوتر الخاص بك ، واختر استكشاف الأخطاء وإصلاحها من شاشة تحديد خيار.
- في شاشة استكشاف الأخطاء وإصلاحها ، انقر فوق خيارات متقدمة ، وانقر فوق موجه الأوامر.
- عند فتح موجه الأوامر ، اكتب الأوامر التالية ، واضغط على Enter بلوحة المفاتيح بعد كل واحد منهم:
bootrec / scanos bootrec / fixmbr bootrec / fixboot bootrec / renbcd
- أعد تشغيل الكمبيوتر ، ويجب أن يتم تشغيله على ما يرام ، دون مواجهة المشكلة مرة أخرى.

الطريقة 2: إصلاح نظام التشغيل الخاص بك باستخدام محرك الاسترداد
ستعمل هذه الطريقة أيضًا على إصلاح نظام التشغيل الخاص بك باستخدام موجه الأوامر الخاص بمحرك الاسترداد ، ويجب أن تكون قادرًا على التمهيد في Windows دون مواجهة المشكلة مرة أخرى. قم بالتمهيد من محرك الاسترداد ، واتبع الإرشادات أدناه.
- استخدم الخطوات من 1 إلى 3 من الطريقة السابقة للوصول إلى موجه الأوامر الخاص بمحرك الاسترداد.
- بمجرد دخولك إلى موجه الأوامر ، اكتب الأوامر أدناه ، متبوعةً بإدخال على لوحة المفاتيح لتنفيذها. و StartRep.exe فائدة بتصحيح القيم بيئة التمهيد ويجب إصلاح الخطأ BCD. لاحظ أنك قد تحتاج إلى تكرار هذه الخطوة عدة مرات في حالة فشلها.
القرص المضغوط س: \ المصادر \ الاسترداد StartRep.exe
- إذا لم تساعدك الخطوة السابقة لإصلاح Windows ، فاكتب bcdedit في موجه الأوامر ، للاطلاع على قيم Windows Boot Manager.
- لاحظ قيم الجهاز . إذا كانت غير معروفة ، فاكتب الأوامر التالية ، متبوعة بكل منها إدخال لتنفيذها. لاحظ أنه يجب استبدال C: بالقسم المثبت عليه نظام التشغيل الخاص بك ، إذا لزم الأمر.
bcdedit / set {DEFAULT.EN_US} قسم الجهاز = c: bcdedit / set {DEFAULT.EN_US} قسم osdevice = c: bcdedit / set {BOOTMGR.EN_US} قسم الجهاز = c:- عند الانتهاء من موجه الأوامر ، أغلقه وأزل محرك الاسترداد وأعد تشغيل نظامك. لا ينبغي أن يكون هناك أي مشاكل في التشغيل الآن.
الجانب السلبي الوحيد لهذه الحلول هو أنها تتطلب محركًا للشفاء وصبرًا وأعصابًا قوية. ومع ذلك ، إذا اتبعتهم كما هو موصوف ، فيجب عليك إصلاح الخطأ الذي تلقيته ، والاستمرار في استخدام جهازك كما كان من قبل.
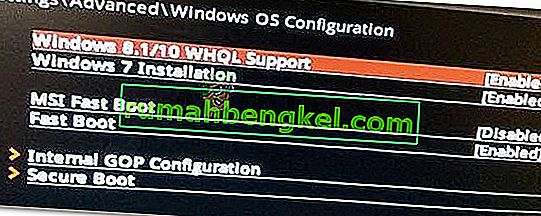
الطريقة الثالثة: تمكين دعم Windows 10 WHQL في BIOS
يوجد إعداد Windows 10 WHQL Support في بعض الشركات المصنعة الأصلية. له وظيفتان أساسيتان: التحقق من وجود برامج تشغيل موقعة أثناء عملية التمهيد ويسمح لك بتمكين دعم UEFI. إذا كنت تستخدم Windows 10 ، فأنت بحاجة إلى تمكينه ومن ثم يمكن لجهاز الكمبيوتر الخاص بك التمهيد بشكل طبيعي. ومع ذلك ، إذا لم يتم تحديده ، فقد يتم تشغيل جهاز الكمبيوتر الخاص بك في الخطأ 0xc000000e. لذلك ، يمكنك الوصول إلى BIOS لمعرفة ما إذا كان إعداد Windows 10 WHQL Support ممكّنًا. إذا لم يكن كذلك ، فقم بتجربته.
يجب ملاحظة أن إعداد Windows 10 WHQL Support غير مدعوم في جميع أجهزة الكمبيوتر. إذا لم يكن جهاز الكمبيوتر الخاص بك يحتوي عليه ، فيمكنك الانتقال للتحقق مما إذا كان دعم UEFI ممكّنًا على جهاز الكمبيوتر الخاص بك. إذا لم يكن الأمر كذلك ، فيمكنك تمكينه لمعرفة ما إذا كان رمز الخطأ 0xc000000e يختفي. من أجل تمكينه:
- أغلق جهاز الكمبيوتر الخاص بك تمامًا واتركه لبضع دقائق على الأقل.
- بعد التأكد من مرور الوقت المناسب ، ابدأ تشغيل الكمبيوتر احتياطيًا وستلاحظ خيار " اضغط على هذا الزر للتمهيد في وضع Bios Mode ".
- اضغط على الزر للتشغيل في وضع Bios.
- بعد التشغيل الناجح داخل وضع Bios ، تحقق لمعرفة ما إذا كان هناك إعداد Windows WHQL في Bios.
- إذا كان موجودًا ، فاضغط على "Enter" لتحديده بعد تمييزه باستخدام مفاتيح الأسهم ، وحدد الخيار "ممكّن" لتمكينه على جهاز الكمبيوتر الخاص بك.
- تحقق لمعرفة ما إذا كان هذا يحل المشكلة.

إذا استمر ظهور خطأ تمهيد Windows 10 0xc000000e بعد تمكين إعداد Windows 10 WHQL Support أو دعم UEFI ، فقد تحتاج إلى إعادة تعيين تكوين BIOS / UEFI على جهاز الكمبيوتر الخاص بك.
الطريقة الرابعة: إعادة إنشاء BCD عبر Easy Recovery Essentials
Easy Recovery Essentials هي ميزة إصلاح آلية للنظام بنقرة واحدة تتضمن إصلاحًا كاملاً وإعادة بناء BCD لحل الخطأ "0xc000000e" ، حتى في الحالات التي يتعذر فيها تشغيل Windows نتيجة الخطأ.
سيعالج مكون إصلاح التمهيد الآلي في EasyRE جميع المشكلات المتعلقة بـ BCD ، أو إصلاح BCD ، أو إعادة إنشائه من نقطة الصفر باستخدام الترميز والمسار الصحيحين للقسم الذي يرفض التحميل بشكل صحيح. سيقوم أيضًا بتمييز القرص على أنه متصل بالإنترنت للتأكد من أنه يعمل بشكل صحيح.
تضمن Easy Recovery Essentials إصلاح الخطأ "0xc000000e" تلقائيًا باستخدام خيار الإصلاح التلقائي المدمج. EasyRE متاح حاليًا لأنظمة التشغيل Windows XP و Vista و 7 و 8 و 10 ويمكن تنزيله وإنشائه على أي جهاز كمبيوتر.
- احصل على جهاز كمبيوتر آخر يمكنك استخدامه لإنشاء USB الذي سنستخدمه لتشغيل الكمبيوتر منه.
- قم بتنزيل Easy Recovery Essentials من هنا.
- حرق الصورة.
- قم بتشغيل جهاز الكمبيوتر الخاص بك من القرص المضغوط لـ Easy Recovery Essentials أو USB الذي قمت بإنشائه.
- بمجرد تشغيل EasyRE ، حدد خيار "الإصلاح التلقائي" وانقر فوق متابعة.
- بعد قيام EasyRE بمسح محركات أقراص جهاز الكمبيوتر الخاص بك ، حدد حرف محرك الأقراص الخاص بتثبيت Windows وحدده من القائمة ، ثم انقر فوق خيار الإصلاح التلقائي للبدء.
- ستبدأ Easy Recovery Essentials في تحليل محرك الأقراص المحدد بحثًا عن المشكلات. سيقوم EasyRE باختبار ومحاولة تصحيح الأخطاء تلقائيًا في القرص والقسم و bootector ونظام الملفات ومحمل الإقلاع والتسجيل. لا يلزم أي تدخل ، لأن إصلاح EasyRE مؤتمت بالكامل.
- بمجرد اكتمال العملية ، ستقوم EasyRE بالإبلاغ عن نتائجها. انقر على إعادة تشغيل زر لإعادة تشغيل جهاز الكمبيوتر الخاص بك واختبار التغييرات.

الطريقة الخامسة: إعادة تعيين تكوين BIOS / UEFI
قال بعض المستخدمين إن مشكلة الخطأ 0xc000000e قد تم حلها عن طريق إعادة ضبط تكوين BIOS / UEFI. لذلك ، يمكنك التفكير في تجربة هذه الطريقة لمعرفة ما إذا كان يمكن حل هذه المشكلة.
الخطوة 1. افتح قائمة BIOS
لإعادة تعيين BIOS إلى الإعدادات الافتراضية ، تحتاج إلى الوصول إلى قائمة BIOS والعثور على خيار الإعدادات الافتراضية أولاً.
يمكن لمستخدمي Windows 10 الوصول إلى خيارات بدء التشغيل المتقدمة Windows 10 والدخول إلى قائمة BIOS. يمكنك النقر فوق ابدأ -> الطاقة ، واضغط مع الاستمرار على مفتاح Shift ، وانقر فوق زر إعادة التشغيل لإعادة تشغيل Windows في بيئة استرداد Windows. ثم انقر فوق استكشاف الأخطاء وإصلاحها -> الخيارات المتقدمة -> إعدادات البرنامج الثابت لـ UEFI ، وانقر فوق إعادة التشغيل للدخول إلى شاشة إعدادات BIOS.
بدلاً من ذلك ، يمكنك أيضًا إعادة تشغيل الكمبيوتر بشكل طبيعي والضغط على المفتاح المطلوب في شاشة بدء التشغيل للتمهيد في نافذة إعدادات BIOS. يتنوع مفتاح التشغيل السريع من مختلف الشركات المصنعة لأجهزة الكمبيوتر ، ويمكن أن يكون F12 و Del و Esc و F8 و F2 وما إلى ذلك.
الخطوة 2. ابحث عن خيار الإعداد الافتراضي
قد يختلف اسم وموقع خيار "الإعدادات الافتراضية للإعداد" عن أجهزة الكمبيوتر المختلفة. تستدعي بشكل عام: تحميل الإعدادات الافتراضية ، تحميل الإعدادات الافتراضية ، تحميل الإعدادات الافتراضية ، تحميل إعدادات BIOS الافتراضية ، تحميل الإعدادات الافتراضية المثالية ، إلخ.
استخدم مفاتيح الأسهم على لوحة مفاتيح الكمبيوتر للعثور على الخيار الافتراضي لإعداد BIOS في شاشة إعدادات BIOS. قد تجده في إحدى علامات تبويب BIOS.
الخطوة 3. إعادة تعيين BIOS
After you find the Load Setup Defaults option, you can select it and press the Enter button to start resetting the BIOS to factory default settings in Windows 10.
At last, you can press F10 to save and exit BIOS. Your computer will automatically reboot. If you need to change BIOS settings again in the future, you can follow the same instructions to access BIOS again to change it.
Method 6: Mark Boot Disk As Online
It is possible in some cases, that the disk that you have connected to the computer or the USB that you are trying to boot from has been marked as offline by the computer. Some computers tend to prevent extra applications, hardware, and other things from being able to run as soon as the computer starts because it allows for more convenient and fast startup experience. Therefore, in this step, we will be marking the Disk as online.
You still need to use a bootable USB medium to do this job. We will show you a step-by-step guide here:
- After booting your computer from the bootable USB drive, you need to go to Next > Repair your computer. Then, you will enter WinRE.
- Go to Troubleshoot > Advanced options > Command Prompt.

- Make sure to properly enter your login credentials if you are asked by the computer.
- Type in the following command inside the command prompt to successfully launch the disk part utility on your computer.
diskpart
- Type in either one of the following commands in the next window to list the currently connected disk drives to your computer.
List Disk List Volume
- Once the disks have been listed, you need to identify the disk that contains the Windows operating system and the one that you want to mark as active.
- After identifying it, select the disk using the following command and replacing the alphabet with the driver letter of that disk.
select disk A Select Volume A (Replace A with the Drive Letter)
- After you have successfully selected the disk, you must mark the disk as online in order to initiate the recognization process of the disk at startup. Use the following commands to do that.
Online Disk Online Volume
- Type in the following command to successfully get out of the command prompt and restart your computer after that.
Exit
- Check to see if marking the Disk as online has fixed your issue.

Method 7: Check your data cables, BIOS and drivers
Unplug all HDD data cables, and then plug them again. Revert to the previous drivers and BIOS settings if they were changed, or use “Restore factory settings” option in the BIOS. Make sure to write down all current BIOS settings that were previously selected, just in case it is required to switch back. If the error is caused by a change of the SATA disk controller’s mode in the BIOS or firmware, the fix can be as simple as entering the BIOS and toggling the SATA controller’s “mode” setting. The exact instructions differ from one manufacturer to the other, but the options will resemble what is shown in the screenshots below.
To check the boot order, follow these steps:
- Restart the computer
- Press the necessary key to open the BIOS menu. This key depends on the computer manufacturer and computer model. This is usually listed on the first screen that appears on the monitor. It can be any of the following: Esc, Del, F2, F8, F10 or F12.
- If the screen shows multiple keys, find the key to open “BIOS”, “setup” or “BIOS menu”
- Attempt to toggle between all three (or more) modes until a combination that results in Windows booting successfully once more is found.
Method 8: Boot Windows In Safe Mode
If above solutions didn’t fix the problem, then Start Windows into safe mode. This will start your PC with minimum system requirements, will not load startup programs, add-ons etc. And allow performing troubleshooting steps to fix Boot Error 0xc000000e:
Before you enter the safe mode, you need to enter the Windows Recovery Environment (winRE). To do this, you will repeatedly turn your device OFF, then ON:
- Hold down the power button for 10 seconds to turn off your device.
- Press the power button again to turn on your device.
- On the first sign that Windows has started (for example, some devices show the manufacturer’s logo when restarting) hold down the power button for 10 seconds to turn off your device.
- Press the power button again to turn on your device.
- When Windows restarts, hold down the power button for 10 seconds to turn off your device.
- Press the power button again to turn on your device.
- Allow your device to fully restart and you should boot into the Windows Recovery Environment.
Now that you are in the Windows Recovery Environment, you will follow these steps to take you to safe mode:
- On the Choose an option, screen, select “Troubleshoot” and then “Advanced options.”
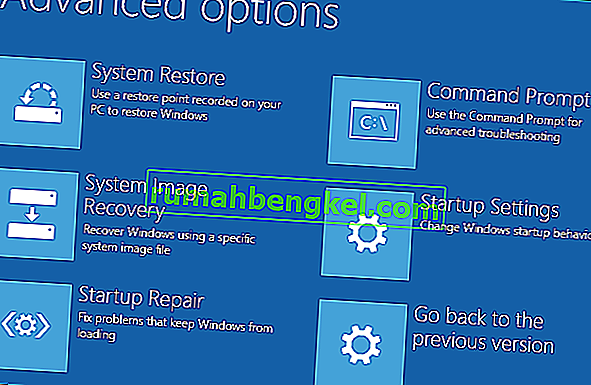
- Now click on “Startup Settings” and click on “Restart.”
- After your device restarts, you’ll see a list of options. Select option “4” from the list or press “F4” to enter Safe Mode.

Note: If you need to exit safe mode, simply restart your device, or:
- Press the “Windows logo key + R.”
- Type “msconfig” in the Run box and then select “OK”.

- Select the Boot tab and under Boot options, clear the Safe boot checkbox.

Method 9: Check your disk with CHKDSK utility
If the hard drive has its file integrity compromised, it is possible to use built-in Windows CHKDSK utility to scan the disk and fix the file system errors.
- Connect a USB drive that has been made bootable or insert the Windows Installation Disk on your computer.
- After connecting one of these, boot from that connected device.
- After booting your computer from the device, click on “Next” and then on the “Repair your Computer” option.
- On the next window, click on “Troubleshoot” and then on the “Advanced” Option.

- On the next screen, make sure to select the “CommandPrompt” option to successfully launch into the command prompt.
- Provide the login credentials of your account in order to boot inside the cmd.
- Inside the command prompt, type in the following command to successfully run the check disk utility on your computer.
chkdsk C: /f (Make sure to replace the "C" with the Drive letter of your partition).
- Confirm any on-screen prompts and wait for the scan to be fully completed.
- Check to see if the issue is fixed by performing this step.
Method 10: Disable fast startup Feature
If your computer has been set up to use the Fast Startup feature, you might be getting this error message on your screen because of doing so. The Fast Startup feature is known to malfunction with some operating systems and hardware combinations.
Basically, when enabled, the feature automatically sends some launch configurations to be stored in your RAM to allow for a faster startup as indicated by its name but this configuration data can sometimes be corrupted which can lead to this error on your computer. Therefore, in this step, we will be disabling it completely. For that:
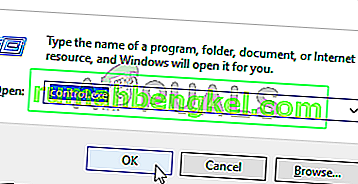
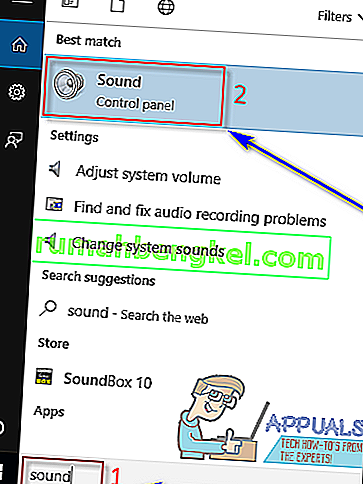
- Press “Windows” + “R” to open the Run prompt.
- Type in “Control Panel” and press “enter” to launch the classical Control Panel interface.
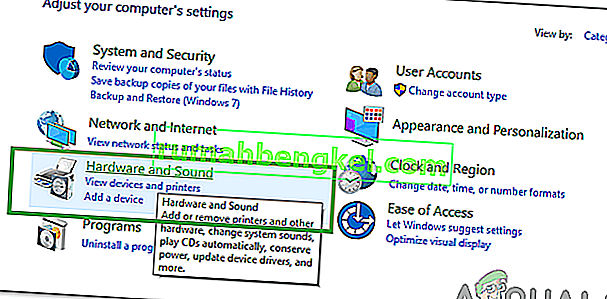
- Inside the control panel, click on the “Hardware and Sound” option and then select the “Power Options” button.
- Inside the power options, click on the “Choose what the power button does” from the left side.
- Click on the “Change Settings” option if the fast startup option is greyed out.
- Make sure to uncheck the “Turn on Fast Startup” option and save your changes.
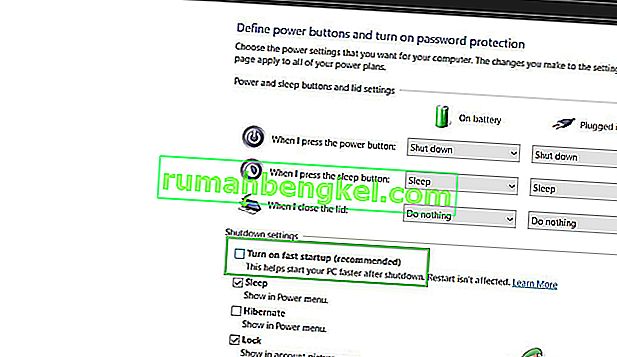
- Closeout of the window and terminate any unnecessary applications.
- Click on the “Start Menu”, click on the “Power Options” and select “Shutdown” from the list.
- This option should completely power down your computer and after performing a complete shutdown, wait for some minutes before turning your computer back on.
- After the computer turns back on, check to see if the error message is fixed.
Note: This solution can only be applied if you are able to sometimes boot up your computer normally and are only encountering this error momentarily.


Method 11: Repair Corrupted System Files
It also possible in some situations that certain system files might have been corrupted due to a storage failure or due to some other reason. Therefore, in this step, we will be performing a complete repair of the corrupted system files and then we will check to see if doing so fixes this issue. For that:
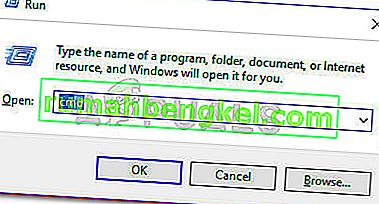
- Press “Windows” + “R” to open the Run prompt.
- Type in “cmd” and then press “Shift” + “Ctrl” + “Enter” to launch the command prompt with admin privileges.
- Type in the following commands one by one and press “Enter” after each to successfully run an SFC scan and a DISM Scan on your computer.
DISM /Online /Cleanup-Image /RestoreHealth sfc /scannow
- Restart your computer completely once these scans are completed.
- Check to see if by performing these scans, you were able to fix this issue on your computer.

Method 12: Run Windows Startup Repair
Startup Repair is capable of diagnosing and fixing the found issues. For example, it can automatically scan system files, registry settings, configuration settings, etc. and try to fix the problem on its own. Startup Repair is especially useful when your computer is unbootable. Since your computer fails to boot, Windows can boot into WinRE automatically. While, if it doesn’t appear, you can interrupt the boot process three times in a row, and then the WinRE screen appears. Alternatively, if you have a bootable USB medium, you can also set your computer to boot from it and go to Repair your computer to enter WinRE.
After you have successfully booted into the Windows Recovery Environment, click on the “Troubleshoot” option, and from there, select the “Advanced Options” screen. Inside the advanced options, select the “StartupRepair” button to successfully initiate the Startup Repairing process. Windows will begin to diagnose your computer automatically. When the process ends, your computer will restart automatically. You can wait to see whether it can boot successfully.

الحل البديل: تأكد من عدم توصيل أي أجهزة إضافية قبل الانتقال إلى سطر الأوامر أو إصلاح بدء التشغيل ، فمن الأفضل تجربة إعادة تشغيل أخرى باستخدام أقل عدد من الأجهزة ومحركات الأقراص الخارجية المتصلة بالكمبيوتر. سيؤدي هذا إلى التأكد من أن لا شيء تمت إضافته مؤخرًا إلى الكمبيوتر لا يسبب هذه المشكلة. سيكون من الأفضل فصل أي محركات أقراص USB وأقراص مضغوطة وأقراص DVD حديثة وما إلى ذلك ، بما في ذلك قارئ بطاقة الذاكرة أيضًا. تأكد من فصل جميع محركات الأقراص الخارجية ومفاتيح USB أو محركات انتقال USB ، ثم حاول مرة أخرى.
![كيفية إصلاح & lsquo ؛ رسالة مجانية: غير قادر على إرسال رسالة - حظر الرسائل نشط & [رسقوو] ؛ خطأ أثناء المراسلة؟](https://pics.rumahbengkel.com/files/guides/298/QWGHDEZ8YPpic.jpg)