OBS Studio هو برنامج مفتوح المصدر يسمح للمستخدمين ببث ألعابهم أو شاشاتهم بشكل احترافي. لديها منصات لكل من نظام التشغيل macOS و Windows. عادة ما يستخدم OBS من قبل اللاعبين المتميزين الذين يفضلون المزيد من التحكم في مشاركة الشاشة الخاصة بهم مقارنة ببرامج تسجيل الشاشة التقليدية.

ابتليت مشكلة OBS لبعض الوقت حيث يواجه المستخدمون "شاشة سوداء" عند محاولة مشاركة شاشاتهم عبر الإنترنت. تظهر هذه المشكلة في الغالب في أنظمة وأنظمة Windows حيث يوجد خياران للرسومات ، أي كلاهما مخصص ومتكامل. في هذه المقالة ، سننظر في جميع الحلول لسبب حدوث هذه المشكلة وما هي خطوات حلها.
ما الذي يسبب ظهور شاشة سوداء في OBS Studio؟
لقد أجرينا مسحًا شاملاً وقمنا بتحليل جميع حالات المستخدمين حيث كانت الشاشة السوداء تحدث عند البث باستخدام OBS. بناءً على تحليلنا ، صادفنا العديد من المذنبين المختلفين الذين قد يكونون سببًا في المشكلة. بعضها مدرج هنا:
- تداخل مخصص للرسومات: عندما تبدأ تشغيل أي تطبيق أو لعبة ، يتعين على نظام التشغيل أن يقرر ما إذا كان سيخصص الموارد من بطاقة الرسومات المخصصة أو من خلال الرسومات المدمجة باللوحة الأم العادية. قد يكون لهذا التحديد تأثير سلبي من حيث ميكانيكا التشغيل وقد لا يتمكن OBS من البث بشكل صحيح.
- امتيازات المسؤول: نظرًا لأن OBS يشارك شاشتك بالكامل ، فقد تكون هناك بعض الحالات التي قد يقيد فيها الكمبيوتر وصوله ، وبالتالي قد لا يتمكن من عرض المحتوى الخاص بك. عادةً ما يؤدي مجرد بدء التطبيق بوصول إداري إلى حل المشكلة على الفور.
- التعارض في تطبيق 32 و 64 بت: يحتوي OBS على نسختين من تطبيقاته وهما 32 و 64 بت. يجب تحديد الإصدار الصحيح وفقًا لنوع نظام التشغيل المثبت على جهاز الكمبيوتر الخاص بك. إذا لم يكن الأمر كذلك ، فلن يكون التطبيق متوافقًا ولن يعمل بشكل صحيح.
- مشكلات التوافق: لقد صادفنا أيضًا عدة حالات لم يكن فيها OBS متوافقًا مع أحدث إصدار من Windows. هنا يبدأ تشغيل التطبيق في وضع التوافق يجبر التطبيق على البدء والعمل كما هو متوقع.
- Overclocking: قد تعمل ميزة Overclocking على تعزيز أداء جهاز الكمبيوتر الخاص بك ولكن لها أيضًا آثارها السلبية على التطبيقات. يمكنك محاولة تعطيل رفع تردد التشغيل ومعرفة ما إذا كان هذا مفيدًا للمشكلة.
- البرامج المتضاربة: قد يكون هناك أيضًا برنامج التقاط مشابه آخر يعمل في الخلفية. قد يتعارض هذا البرنامج مع OBS ويتسبب في سباق على الموارد مما سيؤدي بالتأكيد إلى تعطل OBS وعدم العمل بشكل صحيح.
- خيارات الالتقاط: هناك العديد من خيارات الالتقاط المتاحة في OBS ، على سبيل المثال ، ملء الشاشة أو نافذة معينة ، وما إلى ذلك. يجب اختيار الخيار الصحيح عند التقاط المحتوى.
- جهاز الكمبيوتر في حالة الخطأ: لا يمكن أبدًا استبعاد احتمال وجود جهاز الكمبيوتر في حالة خطأ. يحدث هذا عادة عندما لا تغلق جهاز الكمبيوتر الخاص بك لفترة طويلة. ببساطة ، يعمل تدوير الطاقة على إصلاح المشكلة المطروحة
تأكد من اتباع الحلول من الأعلى والعمل في طريقك إلى أسفل بشكل فعال. يتم ترتيبها من حيث الصعوبة والكفاءة. نتمنى لك استكشاف الأخطاء وإصلاحها!
الحل 1: تدوير الطاقة لجهاز الكمبيوتر الخاص بك
قبل أن نبدأ في استكشاف الأخطاء وإصلاحها على نطاق واسع ، فإن الأمر يستحق إعادة تدوير جهاز الكمبيوتر الخاص بك. كانت هناك العديد من الحالات التي حل فيها تدوير الطاقة ببساطة شاشة OBS السوداء على الفور. يتضمن تدوير الطاقة إغلاق جهاز الكمبيوتر الخاص بك تمامًا وإزالة مصدر الطاقة أيضًا. يؤدي هذا إلى إجبار الكمبيوتر على إزالة جميع التكوينات المؤقتة ، لذا كلما بدأت تشغيله مرة أخرى ، سيتم تهيئة كل شيء من جديد.
- قم بإغلاق جهاز الكمبيوتر الخاص بك بشكل صحيح.
- بمجرد إيقاف تشغيله ، أخرج مأخذ الطاقة أو إذا كنت تستخدم الكمبيوتر المحمول ، فقم بإخراج البطارية .
- الآن اضغط مع الاستمرار على زر الطاقة لبضع ثوان. سيضمن ذلك استنزاف كل الطاقة.
بعد الانتظار لمدة 2-4 دقائق ، أعد توصيل كل شيء وتحقق من حل المشكلة.
الحل 2: تحديد الإصدار الصحيح من OBS Studio
يأتي OBS عادةً في نسختين أي 32 و 64 بت. يتم شحن البرنامج في نسختين لأن نظام التشغيل Windows يأتي أيضًا في نسختين. يتمثل الاختلاف الكبير بين معالجات 32 بت و 64 بت في عدد العمليات الحسابية التي يمكن إجراؤها في الثانية ، مما يؤثر على السرعة التي يمكنهم بها إكمال المهام. في هذا الحل ، سننتقل إلى دليل تثبيت OBS ونحدد الإصدار الصحيح من البرنامج بعد التحقق من إصدار البت الخاص بك.
أولاً ، سوف نتحقق من إصدار نظام التشغيل المثبت على جهاز الكمبيوتر الخاص بك.
- انقر بزر الماوس الأيمن فوق هذا الكمبيوتر وحدد خصائص .

- بمجرد الدخول إلى خصائص الكمبيوتر ، تحقق من العنوان الفرعي للنظام وتحقق من النوع الموجود أمام نوع النظام . دوّن نوع نظام التشغيل وتابع التعليمات أدناه.

سننتقل الآن إلى مجلد التثبيت الخاص بـ OBS ونطلق الإصدار الصحيح من التطبيق وفقًا لهندسة البت في جهاز الكمبيوتر الخاص بك.
- اضغط على Windows + E لتشغيل مستكشف الملفات. ابحث الآن عن OBS في مربع الحوار وافتح موقع الملف كما هو موضح أدناه في الصورة.

- حدد الآن وافتح الإصدار الصحيح من التطبيق بناءً على الإصدار بت من نظام التشغيل الخاص بك. تحقق مما إذا تم حل المشكلة.
الحل 3: تغيير وضع التوافق
لقد تلقينا تقارير مختلطة عن خيار وضع التوافق الموجود في التطبيق. وفقًا لبعض المستخدمين ، لم يكن التطبيق مدعومًا أحدث إصدار من Windows ، وبالتالي كان عليهم تغيير التوافق مع Windows 7 بينما أبلغ بعض المستخدمين أن تعطيل وضع التوافق أدى إلى حل المشكلة على الفور. هنا يمكنك تجربة كلتا الطريقتين والتحقق من أيهما يناسبك. إذا لم يحدث ذلك ، فارجع إلى الإعداد الافتراضي وانتقل إلى الحلول الأخرى.
- اضغط على Windows + S ، وابحث عن OBS ، وانقر بزر الماوس الأيمن على التطبيق وحدد فتح موقع الملف .

- الآن انقر بزر الماوس الأيمن على الملف القابل للتنفيذ وحدد خصائص .

- مرة واحدة في خصائص، حدد التوافق التبويب و تحقق الخيار تشغيل هذا البرنامج في وضع التوافق ل . يمكنك الآن اختيار Windows 7 أو 8.

- حفظ التغييرات و الخروج. حاول الآن تشغيل التطبيق ومعرفة ما إذا كان قد تم حل المشكلة.
الحل 4: منح حقوق المسؤول
هناك مشكلة أخرى تتعلق بسبب عدم قدرتك على بث الشاشة أو اللعبة بشكل صحيح ، وهي أن تطبيقك لا يمتلك امتيازات المسؤول المناسبة. نظرًا لأن OBS يشارك فعليًا كل المحتوى واستخدام الكمبيوتر عبر الإنترنت ، فمن الضروري أن تمنحه حقوق المسؤول. في هذا الحل ، سنفعل ذلك ونتحقق مما إذا كان هذا يحل المشكلة. حتى إذا لم يحدث ذلك ، فتأكد من الاحتفاظ بالخيار محددًا طوال الوقت.
- Navigate to OBS’s executable properties as we did in the previous solution.
- Now click on the Compatibility tab and check the option of Run this program as an administrator.

- Apply changes and exit. Restart your computer and launch OBS again. Now check if the issue is resolved.
Solution 5: Selecting the Correct GPU for Resources
Another interesting phenomenon we came across was where not selecting the correct GPU according to the capture you are using caused several issues including the black screen. The breakdown on which GPU to select according to the display selected is as follows:
- Game capture: Dedicated graphics (NVIDIA or AMD).
- Monitor/display capture: Intel’s stock GPU
Note: This solution is only for users who have a dedicated graphics card installed on their computer.
Here we will signify the methods on how to cater to both the situations. Make sure that you follow them according to your case.
- Right-click anywhere on your screen and select NVIDIA Control Panel.
- Once in the control panel, navigate to Manage 3D settings and click on Program Settings.
- Once in program settings, select the OBS display capture. If you are not able to find the entry, click on Add and look up the software by navigating to its installation directory and selecting the executable from there.

- Now according to the type of capture you are doing (game or monitor), select the correct graphics processor for the program. In the case down below, NVIDIA’s processor is selected.

- Save changes and exit. Now restart your computer and launch OBS again. Check if the black screen issue is resolved.
Solution 6: Changing Drive Permission Settings
If your OBS is installed in your primary drive (C), there are chances that probably even your user might have not have full permissions to edit and modify its contents. This is the usual case and the reason why a conventional user is not allowed access to the drive is because of security reasons because all the core operating system files are present. However, according to some user reports, changing the ownership settings of the drive solved the issue instantly. Make sure that you are logged in as an administrator before following this solution.
- Press Windows + E to launch the File Explorer. Now right-click on your C drive (or whichever drive is set as your main operating system disk) and select Properties.
- Select the Security tab and then click on Edit in front of permissions.

- Now select the option of Authenticated users and select the checkbox of Full control.

- Press Apply to save changes and exit. Restart your computer and start OBS again. Check if the issue is resolved.
Solution 7: Changing Settings of OBS
Another workaround to consider is changing some specific settings of OBS. Usually, OBS allows users to set the configurations according to their own preferences or will. However, in some cases, the custom settings might conflict with the software and cause the black screen. Here we have listed down some of the changes in settings that you have to do in order for OBS to run in optimal settings.
Mode: *Select according to your preference* Screen: *Select according to your game* Priority: *Usually the default one suffices* Sli/crossfire: Check (You can also try unchecking this one later) Force scaling: Uncheck Transparency: Uncheck Framerate lock: Uncheck Record cursor: Check Anti-cheat: Uncheck Overlays: Uncheck
After you have made changes to the settings of OBS, restart it and check if you can stream your screen/games properly without any issues.
Note: You can also change the mode from “Capture any fullscreen application” to “Capture specific window“.
Solution 8: Enabling Multi-adapter compatibility
OBS has a setting of Multi-adapter compatibility which is meant for computers involving SLI or Crossfire technology. SLI/Crossfire is technologies by NVIDIA/AMD which allows users to connect two graphics cards instead of one and utilize them both in your gameplay or applications. Enabling this feature seemed to have fixed the issue of black screen in OBS instantly.

The funny thing is that this fixed the black screen in computers that don’t even have SLI/Crossfire technology installed. To conclude, we can safely say this is a bug in OBS and you have to enable multi-adapter compatibility whether or not you have SLI/Crossfire. You can easily enable this option by selecting the stream and clicking on the gears icon. A new window will pop up from where you can check the option.
Solution 9: Disabling Overclocking
Overclocking allows you to increase the clock rate of your processor until it reaches the threshold temperature set by the manufacturer. Once it reaches the temperature, the clock speed returns back to default so it is cooled down. After it reaches the optimal temperature, its clock speed is increased again and the cycle continues. Overclocking allows users to have better framerates and performance but they aren’t without their share of issues.

We observed that PCs that had overclocking enabled were having the black screen issue in OBS. You should try disabling overclocking and also overclocking related software such as MSI Afterburner and try launching OBS again. If the black screen issue is resolved, consider disabling overclocking for good whenever you are using OBS.
Note: Also try disabling Overlay from GeForce Experience and Windows game bar features. Take into account any additional software features which may provide additional controls over games or video.
Solution 10: Checking for conflicting software
Another reason why you might be experiencing the black screen on your OBS software is that you have additional software running in the background which is also related to screen capture and video recording. This is a very common scenario for users where they ‘think’ that the other third-party software is not running but in reality, it is in the background. In this solution, we will go through all the different software installed on your computer and uninstall all extra software which might be causing the issue.
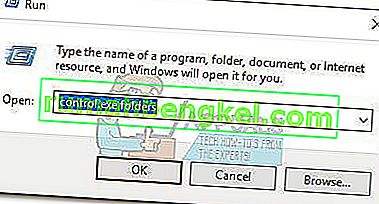
- Press Windows + R, type “appwiz.cpl” in the dialogue box and press Enter.
- Once in the application manager, search for any recording software which you might have installed on your computer. Right-click on it and select Uninstall.

- You should also check your taskbar for any extra applications running in the background. Right-click on each entry and exit the application.

- After you are absolutely sure that no program is running the background, run OBS again and check if the issue is resolved.
Solution 11: Reinstalling the application
If all the above methods don’t work and you are still unable to stream your game/screen successfully using OBS, you should consider reinstalling the application entirely. It is possible that you have a corrupt/outdated copy with issues with several modules. All your preset configurations will be lost during this solution so make sure that you have saved all the work that you need.
- Press Windows + R, type “appwiz.cpl” in the dialogue box and press Enter.
- Once in the application manager, search for OBS, right-click on it and select Uninstall.

- Select both options (one of them will be preselected) and click on Uninstall.

- Restart your computer. Now navigate to OBS Studio’s official website and download the latest version from there. Install it and check if the issue persists in the fresh copy.