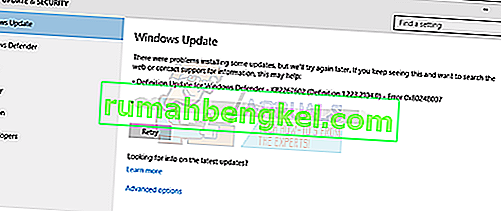
Users typically encounter this issue after attempting to update Windows 10 via Windows Update (WU). The error 0x8024a105signals a problem with the Automatic Updates components.Typically, after a failed update users will see the following message:
“There were problems downloading some updates, but we’ll try again later. If you keep seeing this, try searching the web or contacting support for help. This error code might help: (0x8024a105).”

If you’re currently struggling with this issue, we have managed to identify a few viable fixes that have successfully helped users in a similar situation as you. Please follow each of the methods below in order until you encounter a solution that manages to resolve your problem.
Method 1: Running the Windows Update troubleshooter
Let’s start simple, by running the Windows Update troubleshooter. Some users have managed to allow the updates to get through by allowing the built-in troubleshooter to automatically fix the broken components. Here’s a quick guide on how to run the Windows Update Troubleshooter:
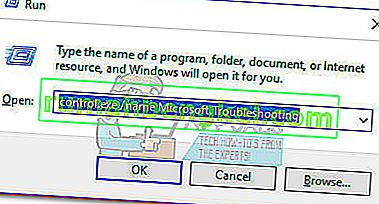
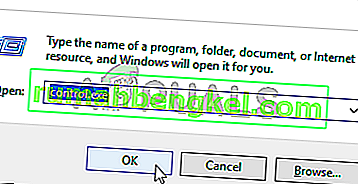
- Press Windows key + R to open up a Run window. Type or paste the following.
control.exe /name Microsoft. Troubleshooting
Hit Enter to open the built-in troubleshooter.
- In the Troubleshoot window, click on Windows Update, then click on Run the troubleshooter.
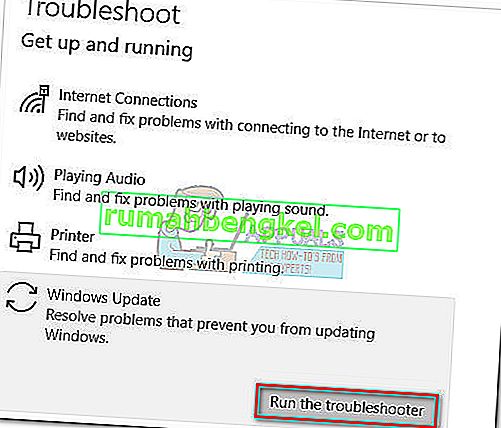
- Wait until the troubleshooter detects problems with your updating client. If it manages to identify any issues with it, follow the on-screen prompts to trigger the automatic repair. Typically, you’ll just need to choose to Apply this fix.
- If the Update Troubleshooter reports that it managed to repair anything, restart your computer and see if the issue is resolved at the next startup.


If the updates are still failing with the 0x8024a105 error, move down to Method 2.
Method 2: Change User Account Control (UAC) Settings
If the troubleshooter didn’t manage to fix the issue automatically, let’s see if the issue is not created by a User Account Control setting. As it turns out, some updates were failing with the 0x8024a105 error because the logged-in account doesn’t have the necessary permissions. You can remedy this issue easily by changing the User Accounts permissions related to your account to the Administrator. Here’s a quick guide to doing this:
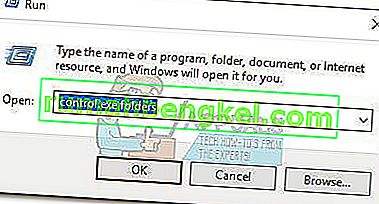
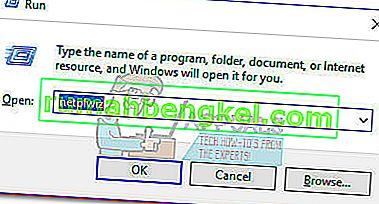
- Press Windows key + R to open up a Run window. Type or paste “netplwiz” and hit Enter to open the built-in troubleshooter.
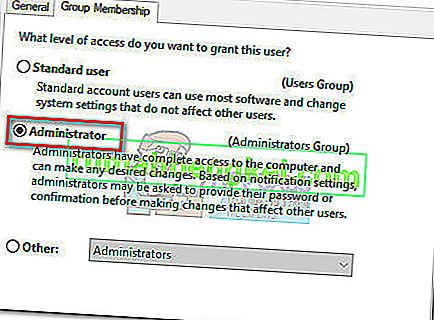
- In the Users tab, select the user that you’re using and click on Properties.
- In the Properties window, go to Group Membership and set the level of access to the Administrator. Hit Apply to save your changes.
 Note: If the level of access is already set to Administrator, move directly to Method 3.
 - Reboot your computer and make sure you log in with the same user account. Once the startup is complete attempt to perform the updates again. If you see them fail with the 0x8024a105 error, move down to the third method.

 Note: If the level of access is already set to Administrator, move directly to Method 3.
Method 3: Resetting the Windows Updates components manually
If the above methods have proved to be unsuccessful, we have little choice but to manually reset the Windows Updates Components and then restart the Windows Update process. Out of the four featured methods, this one has a higher probability of success but requires more tweaking.
Here’s a quick guide to resetting the Windows Updates components:
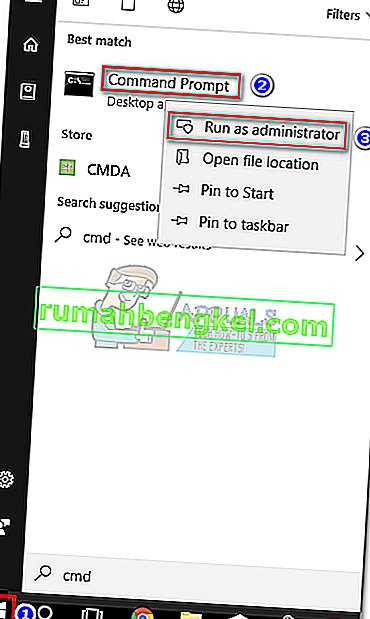
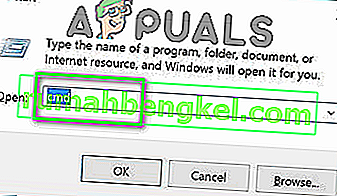
- Click the Windows Start bar (bottom-left corner) and search for “cmd“. Then, right-click on Command prompt and choose Run as Administrator.
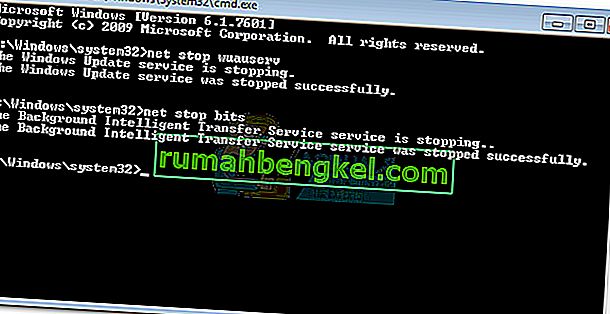
- In the elevated Command Prompt, we are going to stop the services of MSI Installer, Windows Update, BITS, and Cryptographic. To do this, insert the following commands and press Enter after each one:
net stop wuauserv net stop cryptSvc net stop bits net stop msiserver
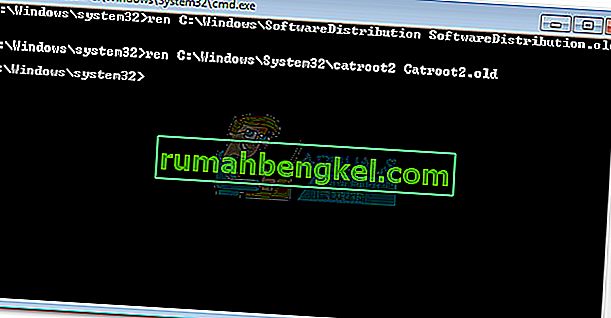
- Once all the services have been stopped, let’s rename the SoftwareDistribution folder and the Catroot2 folder in order to force Windows Update to reinitiate its components. Paste or type the two commands into the elevated Command prompt and press Enter after each one:
ren C:\Windows\SoftwareDistribution SoftwareDistribution.old
ren C:\Windows\System32\catroot2 Catroot2.old
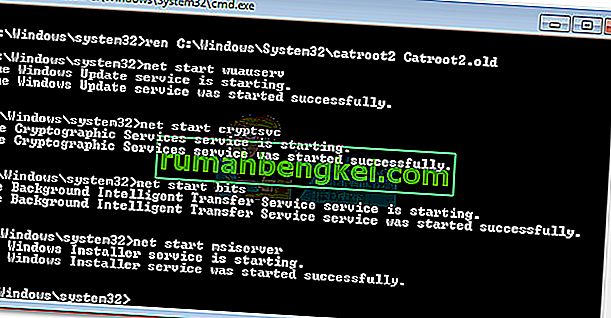
- Once the two folders have been renamed, it’s time to restart the services of MSI Installer, BITS, Cryptographic and Windows Update. To do this, type the following command in Command Prompt and hit Enter after each command:
net start wuauserv net start cryptSvc net start bits net start msiserver
- Once the services have been restarted, close the elevated Command Prompt and reboot your computer.


Method 4: Delete Software Distribution Folder
In some cases, the issue can be fixed simply by deleting a folder using Powershell. Therefore, in this step, first, we will be running PowerShell as an admin and then we will delete the Software distribution folder to kickstart the update process. For that:
- Press “Windows” + “X” buttons simultaneously and select the “Power Shell(Admin)” option.
- Type in the following command and press “Enter” to execute it.
net stop wuauserv
- Again, type in the following command and press “Enter”.
net stop bits
- Lastly, navigate to the following folder.
C:\Windows\SoftwareDistribution
- Press “Ctrl” + “A” to select all the contents of the folder and press “Shift” + “Del” button to delete them permanently.
- Confirm any prompts that warn you about deleting these files and then reboot your computer to complete the process.
- Now, try to update and check to see if the issue persists.

Once your computer boots back up, see whether you are able to install the updates without the 0x8024a105 error. If you do, try to perform an SFC scan to fix any issues with missing files or drivers.
Method 5: Update Using Media Creation Tool
In some cases, you might be unable to update your computer using the default Windows Update process because your Windows might not be able to establish a proper connection with the Update servers. Therefore, in this step, we will be deploying the Windows Media Creation Tool to perform the update for us. It will automatically download and install the update files to upgrade our Windows. For that:
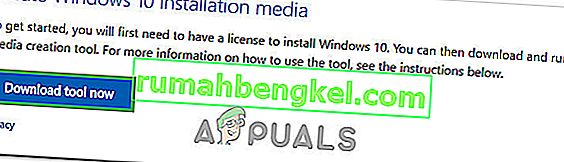
- Download the Windows Media Creation Tool from here.
- Run the executable and follow with the on-screen instructions for the initial setup.
- After the initial setup, select the “Upgrade this PC” option and click on “Next”.
- Accept the License terms and let the installer run.
- The tool will now automatically grab the update files from the servers and update your computer to the latest version available.
- Check to see if doing so has fixed the error.

Method 6: Delete Download Folders
When a new update is downloaded, it is generally stored in some folders on the computer. In this step, we will be deleting some of these folders and which will prompt the operating system to go ahead and download new files which can sometimes clear out the error and the update will be applied normally. For that:
- Press “Windows” + “R” to open the Run prompt.
- Type in “Control Panel” and press “Enter” to launch the classical control panel interface.
- In the Control Panel, click on the “View By:” option and select “Large Icons” from the list.
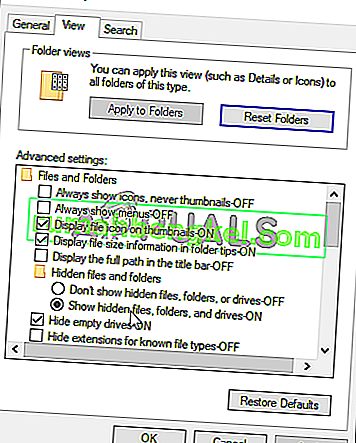
- Click on the “File Explorer Options” and a new window should pop up.
- In the File Explorer Options, click on the “View” button and then double click on the “Files and Folders” button to expand it.
- After that, double click on the ‘Hidden Files and Folders” to expand it as well.
- Check the “Show hidden Files, Folders and Drives” option and click on “Apply” to save your changes.
- Click on “OK” to close out of the window and press “Windows’ + “E” to launch the file explorer.
- In the File Explorer, delete the “$Windows.~WS” and “$Windows. ~BT” folders.
- Make sure to clear out the recycle bin as well so that they cannot be recovered.
- After this, press “Windows’ + “I” to launch settings and click on the “Update and Security” option.
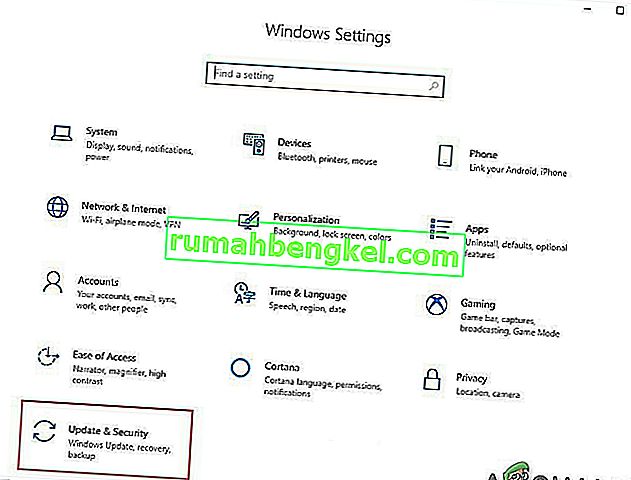
- In Update and Security, click on the “Windows Update” option on the left pane and then click on the “Check for Updates” button.
- Updates will now automatically be downloaded and installed.
- Check to see if the issue persists.


Method 7: Resetting Catroot2 Folder
In some cases, it is possible that the Catroot2 folder and its files have either been corrupted or they have been misconfigured due to which this issue is being triggered. Therefore, in this step, we will first be making some changes from the command prompt and then we will delete the files inside that folder. For that:
- Press “Windows’ + “R” to launch the run prompt.
- Type in “cmd” and then press “Shift” + “Ctrl” + “Enter” to provide administrative privileges.
- Type in the following command and press “Enter” to execute it.
net stop cryptsvc
- After you have stopped the cryptsvc using the command above, type in the following commands into the command prompt one by one and press “Enter” after each to execute them on your computer.
md %systemroot%system32catroot2.old xcopy %systemroot%system32catroot2 %systemroot%system32catroot2.old /s
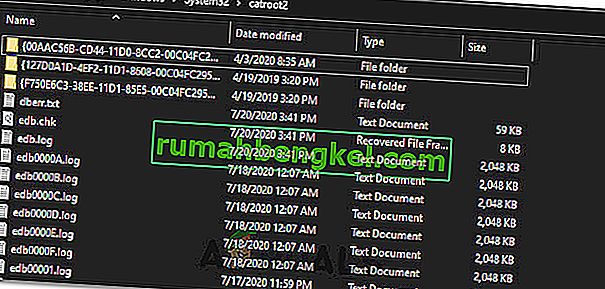
- After executing the commands stated above, we will be deleting all the files from the catroot folder without deleting the folder itself.
- Press “Windows’ + “R” to open the Run prompt and type in the following address to navigate to the catroot folder.
C:/Windows/System32/catroot2
- Press “Ctrl” + “A” once inside the folder to select all items inside it and press “Shift” + “Delete” to remove them from your computer.
- After removing these, confirm any prompts that might spring up on your screen.
- After that, open the command prompt back up and execute the following command.
net start cryptsvc
- Try to update your computer and check to see if the issue still persists.


Method 8: Configuring Services to Start Automatically
Sometimes, your computer might be preventing certain services from starting and functioning in the background due to which the update might not be properly installed or configured to be applied on your computer. Therefore, in this step, we will be setting up some services to startup automatically. For that:
- Press “Windows’ + “R” to launch the Run prompt.
- Type in “cmd” and press “Ctrl” + “Shift” + “Enter” to provide admin permissions.

- Type in the following commands one by one in the command prompt and press “Enter” after each to execute them.
SC Config wuauserv start=auto SC Config bits start=auto SC Config cryptsvc start=auto SC Config trustedinstaller start=auto
- This way, we will have configured these services to startup and run automatically in the background.
- Check to see if the issue persists.

Method 9: Re-register Windows Update and BITS Files
It is possible that some windows update files and Bits files might not be properly registered on your computer. Therefore, in this step, we will be re-registering these files on the computer and then we will check to see if that fixes our issue. For that:
- Press “Windows’ + “R’ to open the Run prompt.
- Type in “cmd” and then press the “Ctrl” + “Shift” + “Enter” buttons to provide admin permissions.
Type in the following commands one by one and press “Enter” after each to register the components.regsvr32.exe atl.dll regsvr32.exe urlmon.dll regsvr32.exe mshtml.dll regsvr32.exe shdocvw.dll regsvr32.exe browseui.dll regsvr32.exe jscript.dll regsvr32.exe vbscript.dll regsvr32.exe scrrun.dll regsvr32.exe msxml.dll regsvr32.exe msxml3.dll regsvr32.exe msxml6.dll regsvr32.exe actxprxy.dll regsvr32.exe softpub.dll regsvr32.exe wintrust.dll regsvr32.exe dssenh.dll regsvr32.exe rsaenh.dll regsvr32.exe gpkcsp.dll regsvr32.exe sccbase.dll regsvr32.exe slbcsp.dll regsvr32.exe cryptdlg.dll regsvr32.exe oleaut32.dll regsvr32.exe ole32.dll regsvr32.exe shell32.dll regsvr32.exe initpki.dll regsvr32.exe wuapi.dll regsvr32.exe wuaueng.dll regsvr32.exe wuaueng1.dll regsvr32.exe wucltui.dll regsvr32.exe wups.dll regsvr32.exe wups2.dll regsvr32.exe wuweb.dll regsvr32.exe qmgr.dll regsvr32.exe qmgrprxy.dll regsvr32.exe wucltux.dll regsvr32.exe muweb.dll regsvr32.exe wuwebv.dll
- After executing the commands listed above, check to see if the issue still persists.

Note: After trying the following fixes, if the issue still persists, try to perform a clean boot and check if that fixes it. If it does, update in the clean boot and then get out of it after the update is completed. If that doesn’t work, try to go for a clean install of Windows.