يواجه العديد من المستخدمين مشكلة حيث يفشل Steam في تنزيل وقتك. يطالب بعدم إمكانية الوصول إلى خوادم المحتوى للتنزيل. من الآمن القول أن هذه المشكلة ليست ناتجة عن أي مشكلة واحدة على وجه الخصوص بسبب العديد من تكوينات المستخدمين. لقد قمنا بإدراج بعض الحلول التي تشمل جميع الطرق من Steam Support وكذلك من المستخدمين.

الحل 1: إزالة إعدادات الوكيل
يتم استخدام خادم وكيل في المؤسسات التي يتم فيها تقييد الوصول إلى الإنترنت المفتوح. يستخدم الوكيل لتتبع الشبكة وتوفير بوابة بديلة للمستخدمين. غالبًا ما تصبح إعدادات الوكيل عقبة عندما يحاول Steam الاتصال بخوادمه للتنزيل.
هناك طريقتان لتعطيل الوكيل على جهاز الكمبيوتر الخاص بك.
الطريقة الأولى: Chrome
- افتح متصفح Chrome وانقر فوق قائمة Chrome (أعلى اليمين) عند الفتح.

- بعد ظهور القائمة المنسدلة ، انقر فوق الإعدادات .

- بمجرد فتح صفحة الإعدادات ، اكتب " proxy " في شريط الحوار الموجود في الأعلى.

- من نتائج البحث ، حدد النتيجة التي تقول " فتح إعدادات الوكيل ".

- عند فتح الإعدادات ، انقر فوق " إعدادات LAN " في علامة التبويب "اتصالات" الموجودة في الجزء السفلي.

- قم بإلغاء تحديد السطر الذي يقول " اكتشاف الإعدادات تلقائيًا ". حفظ التغييرات و الخروج. أعد تشغيل Steam.

الطريقة 2: من خلال إعدادات الشبكة
- اضغط على زر Windows + R لإظهار تطبيق التشغيل.
- في مربع الحوار ، اكتب "inetcpl. cpl ".

- سيتم فتح خصائص الإنترنت. انتقل إلى علامة التبويب Connections وانقر على إعدادات LAN.
- بمجرد الدخول إلى إعدادات LAN ، قم بإلغاء تحديد السطر الذي يقول " اكتشاف الإعدادات تلقائيًا" . احفظ التغييرات واخرج لإعادة تشغيل Steam.
الحل 2: تعطيل ملحقات كروم
في بعض الأحيان ، يمكن أن تخلق الإضافات الموجودة في Chrome عقبة حقيقية. أنها تتداخل مع إعدادات الشبكة وخاصة الوظيفة الإضافية المسمى " Ghostery ". يراقب شبكتك ويوفر إحصائيات عن المكان الذي تترك فيه بصمتك الرقمية. حتى أنه يمنحك التحكم في مواقع الويب التي يمكنها الوصول إلى بياناتك التي لا تستطيع الوصول إليها. يُنصح بتعطيل هذه الوظائف الإضافية من Chrome قبل متابعة التنزيل. إذا كانت المشكلة ناجمة عنهم ، فسيتم حلها.
هذا لا يشمل فقط امتدادات Chrome ، يجب عليك تعطيل أي برنامج مرتبط بشبكتك (مراقب البيانات ، VPN وما إلى ذلك) من الأفضل المحاولة بدلاً من المضي قدمًا في الحلول الأخرى الأكثر تعقيدًا.

الحل 3: تغيير منطقة التنزيل الخاصة بك
يتضمن أحد الإصلاحات الأساسية تغيير منطقة التنزيل.
ينقسم نظام محتوى Steam إلى مناطق مختلفة. يكتشف العميل منطقتك تلقائيًا من خلال شبكتك ويعينها كمنطقة افتراضية. في بعض الأحيان ، قد تكون الخوادم في منطقة معينة محملة بشكل زائد أو ربما تمر بفشل في الأجهزة. وبالتالي ، قد يؤدي تغيير منطقة التنزيل إلى حل المشكلة المعنية. يمكنك دائمًا محاولة تغيير مناطق التنزيل عدة مرات (لا يقتصر الأمر على محاولة واحدة فقط) قبل متابعة المزيد من الحلول.
- افتح Steam وانقر على " الإعدادات " في القائمة المنسدلة في الزاوية العلوية اليسرى من النافذة.
- حدد " التنزيلات " وانتقل إلى " منطقة التنزيل ".
- حدد مناطق أخرى غير منطقتك وأعد تشغيل Steam.

الحل 4: حذف clientregistry.blob
قد يتلف سجل عميل Steam الخاص بك وقد يكون هذا هو سبب مواجهتك للخطأ. يمكننا محاولة إعادة تسميته / حذفه.
- قم بإنهاء Steam تمامًا وإنهاء جميع المهام كما هو مذكور في الحل أعلاه.
- تصفح إلى دليل Steam الخاص بك. الافتراضي هو C: \ Program Files \ Steam .
- حدد موقع " clientregistry.blob" .

- أعد تسمية الملف إلى " clientregistryold.blob " (أو يمكنك حذف الملف بالكامل).
- أعد تشغيل Steam واسمح بإعادة إنشاء الملف.
نأمل أن يعمل عميلك كما هو متوقع. إذا استمرت المشكلة ، فاتبع الخطوات المذكورة أدناه.
- استعرض مرة أخرى إلى دليل Steam الخاص بك.
- حدد موقع "Steamreporter". إكس .

- قم بتشغيل التطبيق وأعد تشغيل Steam.
الحل 5: مسح قائمة انتظار تنزيل Steam
إذا كان لديك الكثير من التنزيلات المعلقة في عميل Steam الخاص بك ، يُنصح بإزالتها جميعًا باستثناء واحدة وإعادة تشغيل Steam.
- افتح عميل Steam الخاص بك وتوجه إلى علامة التبويب Library .
- في الجزء السفلي ، سترى خيارًا قابلاً للنقر يقول "تم إيقاف التنزيل مؤقتًا ". انقر فوقه حتى تظهر جميع الخيارات في قائمة الانتظار.

- انقر فوق الزر واحدًا تلو الآخر كما هو موضح في الصورة أدناه لإزالة العناصر من قائمة الانتظار.

- بمجرد إزالتها ، انقر بزر الماوس الأيمن على الألعاب (باستثناء اللعبة التي تريد تنزيلها أولاً) حتى تظهر الإعدادات. بمجرد فتح الإعدادات ، انقر فوق الزر " إزالة التثبيت ".

- سيطالبك Steam بتأكيد أفعالك. انقر فوق حذف عند ظهور المطالبة وأعد تشغيل Steam قبل محاولة تنزيل تلك اللعبة مرة أخرى.

الحل 6: استخدام ملف التكوين المتدفق
يمكننا محاولة تشغيل الأمر flush config لإعادة ضبط التكوين. اتبع الخطوات التالية.
- اضغط على Windows + R لإحضار تطبيق Run.
- في شريط الحوار ، اكتب " steam: // flushconfig ".

- اضغط موافق . ستظهر Steam الآن نافذة لتأكيد أفعالك. اضغط على موافق وأعد تشغيل Steam.

الحل 7: بدء تشغيل Steam في الوضع الآمن مع الشبكات.
قبل اللجوء إلى المزيد من الأساليب التقنية ، يمكنك محاولة تشغيل جهاز الكمبيوتر الخاص بك في الوضع الآمن (مع الشبكات) ومحاولة بدء تنزيل Steam.
- اجعل جهاز الكمبيوتر الخاص بك في الوضع الآمن عن طريق الاختيار من بين الخيارات المختلفة المتاحة. حدد " تمكين الوضع الآمن مع الاتصال بالشبكة ". يمكنك معرفة كيفية توصيل جهاز الكمبيوتر الخاص بك إلى الوضع الآمن من هنا. إذا كنت تقوم بتشغيل Windows 7 ، فاضغط على F8 عند بدء تشغيل جهاز الكمبيوتر الخاص بك وسيتم توجيهك إلى نافذة مماثلة حيث يمكنك تحديد الخيار المطلوب.
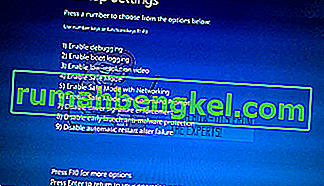
- افتح Steam وحاول التحديث / التثبيت معه مرة أخرى. يجب أن تزيل هذه الطريقة جميع العقبات (إن وجدت) التي قد يواجهها Steam.

الحل 8: تعطيل الويب الآمن من جهاز التوجيه
قد يحتوي جهاز توجيه WiFi الخاص بك على إعداد يسمى الويب الآمن . ما يفعله هذا هو تصفية جميع البيانات الواردة التي يرى أنها غير جديرة بالثقة. من الشائع جدًا أن تقوم بوضع علامة على Steam كواحد وتعطيل الاتصال بجهاز الكمبيوتر الخاص بك.
نظرًا لوجود المئات من أجهزة التوجيه المختلفة التي يستخدمها المستخدمون ، فمن الصعب جدًا سرد الحل حول كيفية تعطيل الخيار لكل واحد منهم. فيما يلي بعض الإرشادات حتى يكون لديك فكرة.
- يمكن العثور على Web Safe في قسم الرقابة الأبوية في تكوين جهاز توجيه WiFi.
- يمكن العثور عليها أيضًا في قسم الفيروسات أو قسم التصفية .
- لإدخال إعدادات جهاز التوجيه ، اكتب عنوان IP المرتبط به (على سبيل المثال ، يكون 192.168.1.1 بالنسبة للبعض). يمكنك التحقق من عنوان IP المطلوب إما عن طريق الاتصال بمزود المودم الخاص بك أو من خلال النظر إلى الجزء الخلفي من الجهاز (حتى علبة التغليف الخاصة به قد تحتوي على تفاصيل).
الحل 9: تعطيل برنامج مكافحة الفيروسات والمدافع / جدار الحماية
قبل الشروع في إعادة تثبيت Steam ، يمكننا محاولة التدخل في برنامج مكافحة الفيروسات. يراقب برنامج مكافحة الفيروسات كل حزمة يرسلها جهاز الكمبيوتر الخاص بك ويستقبلها. على الرغم من تعاون Steam مع معظمهم حتى لا يتسببوا في مشاكل ، إلا أنهم يفعلون ذلك في بعض الأحيان. الحل هو تعطيل / إلغاء تثبيتها والتحقق مما إذا كنت قادرًا على التنزيل بعد ذلك.
مكافي انتي فيروس :
McAfee has no way to exclude certain files from its real time scanning. The only way is to disable the antivirus entirely until the game is updated. To do this, open McAfree and select “Virus and Spyware Protection”. Here you find the option of “Real-Time Scanning”. Click that option and turn it off.

Then follow the following instruction to verify integrity of game files.
- Restart your computer and relaunch Steam.
- Head over to the library section and right click on the game which is giving you problems.
- Click on its properties and select the local files tab.
- Click the verify integrity of game files button and Steam will verify that game in a few minutes.
Hopefully, after performing the above steps, your Steam won’t give any issue.

ESET NOD32
NOD32 has the tendency to mark some application files as malicious and will most probably quarantine it. This often results in the error while updating a game. Browse to your current Steam directory and copy the address
- The default location for your steam folder should be “C:\Program Files (x86)\Steam”.
Press ⊞ Win + R button. This should pop-up the Run application.
In the dialogue box write “C:\Program Files (x86)\Steam”.

Or if you installed Steam in another directory, you can browse to that directory and you can proceed with steps mentioned below.
After copying the address open ESET NOD32 and paste the location in exclude from real time scanning.
Follow the ‘verify integrity of game files’ method listed above and you will be all good.

Kaspersky AV
Kaspersky may sometimes flag Steam as an intruder and disable it from making any changes to the hard drive. To fix this, head over to ‘threats and exclusions’. Navigate to ‘trusted zone’ and add Steam.exe as a trusted application. Remember to change the settings to Do not restrict application activity as well as Do not scan opened files.
Follow the ‘verify integrity of game files’ method listed above and restart your computer.

Windows Defender
- Click Windows button and in the search bar type “Windows defender”. Among all the options, there will be an application named “Windows Defender Security Center”. Open it.
- Upon opening, you will find a list of options available in the new window. Select the option “Virus and threat protection”.

- Upon entering the menu, navigate to Virus and Threat Protection Settings. Windows may prompt you to allow administrator access to use this feature. If so, press Yes.

- After entering the required menu, you should search the window which says “Add or remove exclusions”. Click it and you will be navigated to a menu where you can add exclusions. You can exclude folders, extensions, and even files. In this case, we will exclude the whole Steam folder which is located in the directory you downloaded it.

- Click on the option which says “Exclude a folder” and navigate to your Steam directory. The default location for your steam folder should be “C:\Program Files (x86)\Steam”. Once you reach the location select the folder and save changes.
- Restart your computer and run Steam with administrative privileges. Hopefully, your speed issue will be resolved.
Solution 10: Downloading Latest Steam Client
- The default location for your steam folder should be “C:\Program Files (x86)\Steam”.
Press ⊞ Win + R button. This should pop-up the Run application.
In the dialogue box write “C:\Program Files (x86)\Steam”.

Or if you installed Steam in another directory, you can browse to that directory and you can proceed with steps mentioned below.
- Locate the following folders:
Steam.exe (Application)SteamApps (Folder)Userdata (Folder)
- Delete all the other files/folders/applications except the ones mentioned above.
- Head over to the Steam website and download the latest Steam client. Don’t launch the old Steam.exe present in your directory at all. The problem won’t be solved.
- Install Steam using the installer in the same directory as your previous one. Hopefully, after installation, the problem will be solved.
Solution 11: Changing Default Browser
In a weird turn of events, having Chrome or any other browser set as the default browser sometimes causes issues with the download request that Steam sends to its servers. Therefore, in this step, we will be setting internet explorer as our default browser temporarily to make sure that the download proceeds. For that:
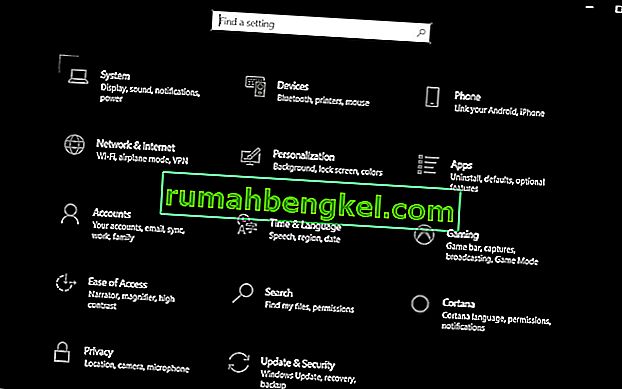
- Press “Windows’ + “I” to open settings.
- In settings, click on “Apps” and then select “Default Apps” from the left pane.
- Click on the “Web browser” option and then select “Internet Explorer” from the list.
- Open Steam and check to see if the issue persists.

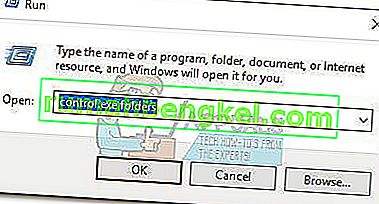
Solution 12: Removing Steam Content Server Limiter
In certain cases, it was shown that uninstalling Steam Content Server Limiter from the Classical Control Panel interface fixes this issue for a lot of people. Therefore, in this step, we will be doing exactly that. For that:
- Press “Windows’ + “R” to open the Run prompt.
- Type in “Control” and press “Enter”.

- Click on the “Uninstalla Program” option and then right-click on the “Steam Content Server Limiter” and select “Uninstall”.
- After the server limiter is uninstalled, check to see if the issue persists.

Method 13: Changing DNS
In certain situations, the server DNS that the computer is using to communicate with the internet might not be compatible either with the steam servers or it might be facing issues temporarily. Therefore, in this step, we will be changing our DNS servers. For that;
- Press “Windows’ + “R” to open the Run prompt.
- Type in “ncpa.cpl” and press “enter”.

- Right-click on your network adapter and select “Properties”.
- In properties, double click on the “Internet Protocol Version 4(TCP/IPV4)” option and check the “Use following DNS Addresses” option.
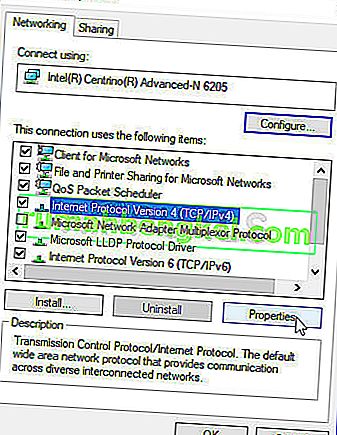
- Type in “8.8.8.8” in the primary DNS address and “8.8.4.4” in the secondary DNS address.
- Click on “OK” and then check to see if the issue persists. If it does, try using “1.1.1.1” and “1.0.0.1” in the fields respectively.


Method 14: Changing Config File
In certain situations, the config file on the computer might require some editing in order to get it some games to start working. The steps listed below are primarily for Mac but you can try them on some older OS such as Windows XP too as some users reported that this fixed it for them.
- Open the Mac Finder and navigate to the following directory.
drive_c/Program Files/Steam/config/
- Launch the “config.vdf” file and wait for it to open.
- Find the following text lines inside the file.
"InstallConfigStore" { "Software" { "Valve" { "Steam" "cip" - Paste the following lines of code under the “cip” entry in the config after creating a new line under it.
CS" "valve511.steamcontent.com;valve501.steamcontent.com;valve517.steamcontent.com;valve557.steamcontent.com;valve513.steamcontent.com;valve535.steamcontent.com;valve546.steamcontent.com;valve538.steamcontent.com;valve536.steamcontent.com;valve530.steamcontent.com;valve559.steamcontent.com;valve545.steamcontent.com;valve518.steamcontent.com;valve548.steamcontent.com;valve555.steamcontent.com;valve556.steamcontent.com;valve506.steamcontent.com;valve544.steamcontent.com;valve525.steamcontent.com;valve567.steamcontent.com;valve521.steamcontent.com;valve510.steamcontent.com;valve542.steamcontent.com;valve519.steamcontent.com;valve526.steamcontent.com;valve504.steamcontent.com;valve500.steamcontent.com;valve554.steamcontent.com;valve562.steamcontent.com;valve524.steamcontent.com;valve502.steamcontent.com;valve505.steamcontent.com;valve547.steamcontent.com;valve560.steamcontent.com;valve503.steamcontent.com;valve507.steamcontent.com;valve553.steamcontent.com;valve520.steamcontent.com;valve550.steamcontent.com;valve531.steamcontent.com;valve558.steamcontent.com;valve552.steamcontent.com;valve563.steamcontent.com;valve540.steamcontent.com;valve541.steamcontent.com;valve537.steamcontent.com;valve528.steamcontent.com;valve523.steamcontent.com;valve512.steamcontent.com;valve532.steamcontent.com;valve561.steamcontent.com;valve549.steamcontent.com;valve522.steamcontent.com;valve514.steamcontent.com;valve551.steamcontent.com;valve564.steamcontent.com;valve543.steamcontent.com;valve565.steamcontent.com;valve529.steamcontent.com;valve539.steamcontent.com;valve566.steamcontent.com;valve165.steamcontent.com;valve959.steamcontent.com;valve164.steamcontent.com;valve1611.steamcontent.com;valve1601.steamcontent.com;valve1617.steamcontent.com;valve1603.steamcontent.com;valve1602.steamcontent.com;valve1610.steamcontent.com;valve1615.steamcontent.com;valve909.steamcontent.com;valve900.steamcontent.com;valve905.steamcontent.com;valve954.steamcontent.com;valve955.steamcontent.com;valve1612.steamcontent.com;valve1607.steamcontent.com;valve1608.steamcontent.com;valve1618.steamcontent.com;valve1619.steamcontent.com;valve1606.steamcontent.com;valve1605.steamcontent.com;valve1609.steamcontent.com;valve907.steamcontent.com;valve901.steamcontent.com;valve902.steamcontent.com;valve1604.steamcontent.com;valve908.steamcontent.com;valve950.steamcontent.com;valve957.steamcontent.com;valve903.steamcontent.com;valve1614.steamcontent.com;valve904.steamcontent.com;valve952.steamcontent.com;valve1616.steamcontent.com;valve1613.steamcontent.com;valve958.steamcontent.com;valve956.steamcontent.com;valve906.steamcontent.com"
- Save your changes and check to see if the issue persists.
Note: Some users reported to fix the issue after having to deleting the CM List IP addresses in the file aswell in addition to pasting this code.