قام بعض مستخدمي Windows الذين قاموا بالترقية مؤخرًا إلى Windows 10 بتقديم شكاوى من تجميد شريط المهام تمامًا عدة مرات. عندما يحدث هذا ، لا يمكن للمستخدمين النقر فوق أي عنصر على شريط المهام ، مثل قائمة ابدأ ، والرموز ، والإخطارات. أيضًا ، اختصارات مثل Windows + R و Windows + X لا تعمل.
هذه المشكلة ليس لها سبب جذري لأنها شائعة جدًا على Windows. ومع ذلك ، فقد ربطه البعض بـ Dropbox واثنين من التطبيقات المعطلة. في هذه المقالة ، سوف نستكشف الخيارات المختلفة التي يمكننا من خلالها حل هذه المشكلة. يتضمن ذلك إجراء فحص SFC ، وإلغاء تثبيت تطبيقات معينة ، وبدء المستكشف ، من بين أمور أخرى.
الطريقة الأولى: إعادة تشغيل مستكشف Windows
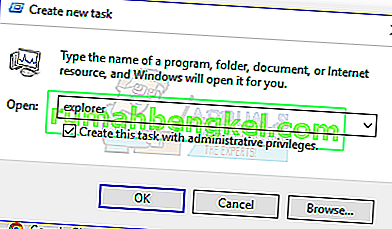
- اضغط على مفاتيح Ctrl + Shift + Esc لتشغيل إدارة مهام Windows.
- في مدير المهام ، انقر فوق ملف > تشغيل مهمة جديدة . اكتب explorer في المربع المفتوح ثم حدد المربع "إنشاء هذه المهمة بامتيازات إدارية" وانقر فوق موافق .

بدلاً من ذلك ، يمكنك:
- اضغط على مفاتيح Ctrl + Shift + Esc لتشغيل إدارة مهام Windows.
- ابحث عن Explorer في علامة تبويب العمليات
- انقر بزر الماوس الأيمن فوق إدخال Explorer وحدد إعادة التشغيل .
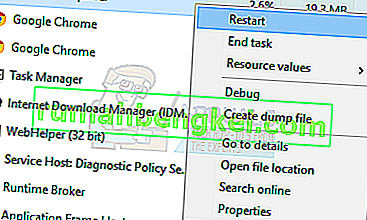
- سيتم إعادة تشغيل Explorer ويجب أن يبدأ شريط المهام في العمل مرة أخرى

الطريقة 2: تشغيل SFC Scan
- اضغط على مفاتيح Ctrl + Shift + Esc لتشغيل إدارة مهام Windows.
- في مدير المهام ، انقر فوق ابدأ> تشغيل مهمة جديدة . اكتب cmd في المربع المفتوح ، ثم حدد المربع "إنشاء هذه المهمة بامتيازات إدارية" وانقر فوق موافق .
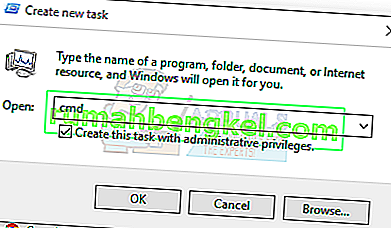
- في موجه الأوامر ، اكتب الأوامر التالية ، واضغط على Enter بعد كل أمر:
sfc / scannow تفكيك / عبر الإنترنت / تنظيف الصورة / استعادة الصحة
سيؤدي هذا إلى تشغيل فحص ملفات النظام وإصلاح جميع ملفات النظام الفاسدة على جهاز الكمبيوتر الخاص بك.
- أعد تشغيل الكمبيوتر وتحقق مما إذا كان شريط المهام المجمد قد توقف.

الطريقة الثالثة: إصلاح Powershell
استخدم أمر Powershell هذا لإلغاء تجميد شريط المهام المجمد باستخدام هذه الخطوات.
- مفاتيح Ctrl + Shift + Esc لتشغيل إدارة مهام Windows.
- انقر فوق مزيد من التفاصيل ، وحدد علامة التبويب الخدمات وتأكد من تشغيل MpsSvc (جدار حماية Windows).
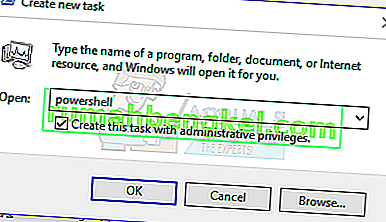
- اضغط على مفتاح Windows + R لفتح موجه التشغيل. اكتب powerhell في الموجه واضغط على Enter.
إذا فشل فتح موجه التشغيل ، فاضغط على مفاتيح Ctrl + Shift + Esc لتشغيل إدارة مهام Windows ، وانقر فوق ابدأ> تشغيل مهمة جديدة . اكتب بوويرشيل في المربع المفتوح ، ثم حدد المربع "إنشاء هذه المهمة بامتيازات إدارية" وانقر فوق موافق .
- في نافذة Powershell ، الصق الأمر التالي واضغط على Enter:
Get-AppXPackage -AllUsers | Foreach {Add-AppxPackage -DisableDevelopmentMode -Register “$ ($ _. InstallLocation) \ AppXManifest.xml”}. - يجب أن يعمل شريط المهام بشكل كامل بعد ذلك.

الطريقة الرابعة: تمكين إدارة المستخدمين
قد ينتج عن User Manager المعطل شريط مهام Windows 10 مجمّد. حاول إعادة تمكين User Manager بهذه الخطوات.
- اضغط على مفتاح Windows + R واكتب services.msc وانقر فوق موافق . هذا يفتح وحدة الخدمات.
- ابحث عن User Manager وانقر فوقه نقرًا مزدوجًا.
- تعيين نوع بدء التشغيل إلى تلقائي و بدء الخدمة إذا تم إيقافها. انقر فوق " موافق" .
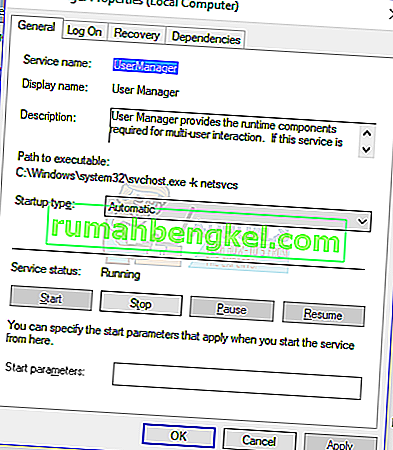
- أعد تشغيل جهاز الكمبيوتر الخاص بك ويجب أن يعمل شريط المهام بشكل مثالي في هذا الوقت.

الطريقة الخامسة: إلغاء تثبيت التطبيقات
تم تحديد تطبيقات معينة من قبل بعض المستخدمين مما تسبب في عدم عمل شريط المهام بشكل صحيح. هذه التطبيقات هي Dropbox و Classic Shell . إذا كنت تشك في وجود أي تطبيقات تسبب ذلك ، فيمكنك إزالته أيضًا.
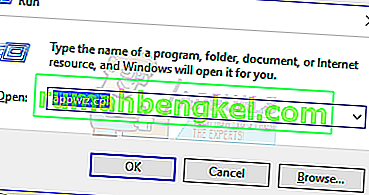
- اضغط على مفتاحي Windows + R لفتح موجه التشغيل. اكتب appwiz. العريف وضرب أدخل .
- حدد موقع التطبيق في قائمة التطبيقات المثبتة ثم انقر نقرًا مزدوجًا فوقه. الآن ، اتبع المطالبات لإكمال إلغاء التثبيت.
- أعد تشغيل جهاز الكمبيوتر الخاص بك ثم تحقق مما إذا كان شريط المهام يعمل بشكل صحيح الآن.

الطريقة 6: تعطيل العناصر التي تم فتحها مؤخرًا
يمكن أن تؤدي العناصر المفتوحة مؤخرًا إلى إبطاء بدء تشغيل القائمة. تعطيلها يجعله أسرع ويمنع أي تجمد. اتبع هذه التعليمات لتعطيل العناصر التي تم فتحها مؤخرًا.
- اضغط على Win + I لفتح تطبيق الإعدادات.
- انتقل إلى التخصيص> ابدأ
- قم بتمرير زر التبديل بجوار إظهار العناصر التي تم فتحها مؤخرًا في قوائم الانتقال في قائمة البدء أو شريط المهام لإيقاف تشغيله.

- يجب ألا يتجمد شريط المهام عند التمهيد عند إعادة التشغيل التالية

الطريقة السابعة: إعادة تعيين خدمات Windows 10 الافتراضية
إذا لم تنجح أي من الطرق المذكورة أعلاه في هذه المرحلة ، فحاول تشغيل هذا البرنامج النصي كمسؤول عن طريق النقر بزر الماوس الأيمن فوقه وتحديد تشغيل كمسؤول . إذا لم يعد WiFi الخاص بك يعمل لسبب ما ، فاتبع الخطوات هنا (في الطريقة 3 - الخطوة 2: الخيار 2) لإصلاح مشكلة WiFi.
الطريقة الثامنة: إنشاء حساب مستخدم جديد
في بعض الحالات ، قد يتم تشغيل الخطأ إذا لم يتم تعيين إعدادات حساب المستخدم أو التكوينات بشكل صحيح وأيضًا في حالة وجود أي تلف في بيانات التكوين هذه. لذلك ، كبديل ، يمكنك محاولة إنشاء حساب مستخدم جديد على جهاز Windows 10 الخاص بك ثم استيراد البيانات من الحساب الأقدم لاحقًا إذا تم حل المشكلة. في سبيل عمل ذلك:
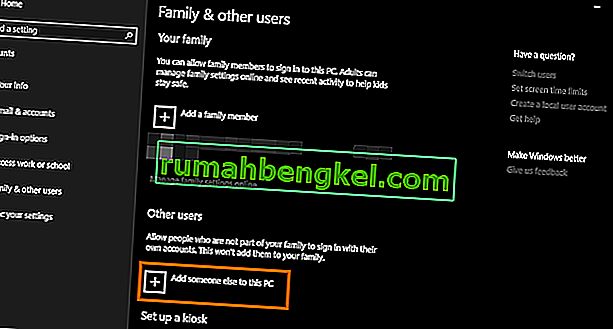
- اضغط على "Windows" + "I" لفتح الإعدادات والنقر على خيار "الحسابات" .
- في خيار الحسابات ، انقر فوق الزر "العائلة والمستخدمون الآخرون" من الجانب الأيسر.
- حدد خيار " إضافة شخص آخر إلى هذا الكمبيوتر " من القائمة.
- انقر فوق الزر " ليس لدي معلومات تسجيل دخول هذا الشخص " في النافذة التالية.
- انقر فوق الخيار "إضافة مستخدم بدون حساب Microsoft" من النافذة الجديدة المنبثقة.
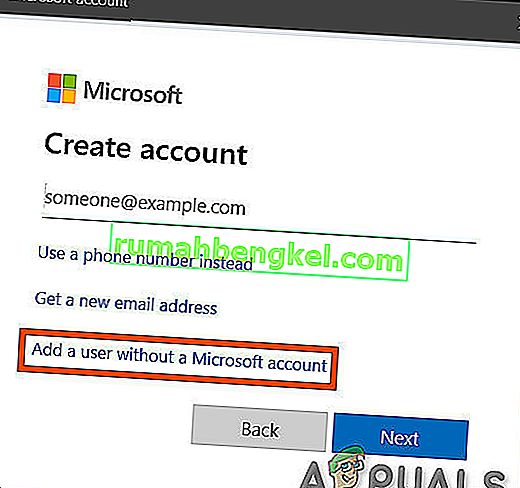
- أدخل اسم مستخدم حساب المستخدم وقم بتعيين كلمة مرور له.
- أدخل أسئلة الأمان ، وأجب عنها ، ثم انقر فوق خيار "التالي" .
- بعد إنشاء هذا الحساب ، انقر فوقه ثم حدد خيار "تغيير نوع الحساب" .
- انقر فوق القائمة المنسدلة "نوع الحساب" ثم حدد خيار "المسؤول" .
- احفظ التغييرات وقم بتسجيل الدخول إلى هذا الحساب.
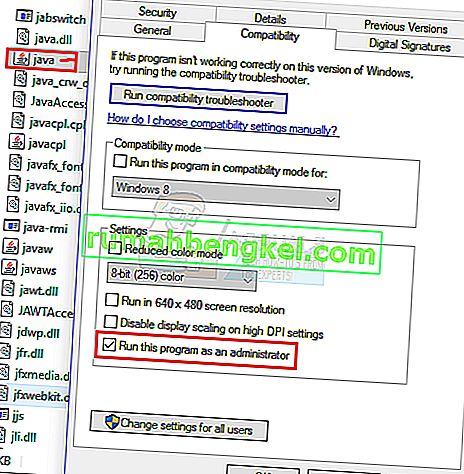
- بعد تسجيل الدخول إلى الحساب ، قم بتشغيل Steam وتحقق لمعرفة ما إذا كانت اللعبة تعمل.


إذا أدى القيام بذلك إلى إصلاح المشكلة على جهاز الكمبيوتر الخاص بك ، فتأكد من استيراد بيانات حساب المستخدم من الحساب السابق إلى هذا الحساب الجديد والاستمرار في استخدامه بشكل طبيعي.
الطريقة 9: التشخيص في الوضع الآمن
في بعض الأحيان ، ربما تكون قد قمت بتثبيت بعض تطبيقات الطرف الثالث على جهاز الكمبيوتر الخاص بك والتي قد تمنعك من تشغيل شريط المهام أو الخدمات المرتبطة به بشكل صحيح. بالإضافة إلى ذلك ، من الممكن أنه حتى خدمة Windows أو Microsoft تمنع الأداء السليم للكمبيوتر. لذلك ، في هذه الخطوة ، سنقوم بتشخيص هذه المشكلة في الوضع الآمن وبعد ذلك سنتحقق لمعرفة ما إذا كان يمكن إصلاحها. من أجل هذا:
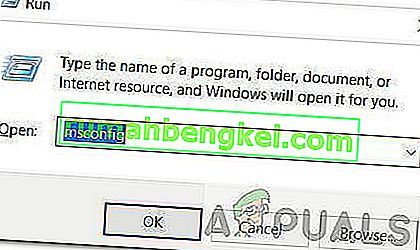
- اضغط على " Windows" + " R" لتشغيل موجه التشغيل.
- اكتب " MSCONFIG" واضغط على " Enter" لبدء تشغيل نافذة تكوين Microsoft.
- في هذه النافذة ، انقر فوق علامة التبويب "الخدمات" وقم بإلغاء تحديد "إخفاء جميع خدمات Microsoft"
- بعد إلغاء تحديد هذا الخيار ، انقر فوق الزر "تعطيل الكل" وانقر فوق "تطبيق" لحفظ التغييرات.
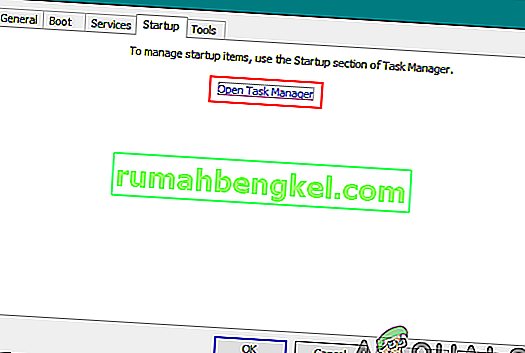
- بعد ذلك ، انقر فوق علامة التبويب "بدء التشغيل" ثم انقر فوق الزر "فتح مدير المهام" لبدء تشغيل مدير المهام.
- في مدير المهام ، انقر فوق كل تطبيق تم تمكينه ثم انقر فوق الزر "تعطيل" لمنعه من التشغيل عند بدء التشغيل.
- أعد تشغيل الكمبيوتر للتمهيد الآن في الوضع الآمن.
- في الوضع الآمن ، تحقق لمعرفة ما إذا كان شريط المهام يتجمد بعد بعض الوقت أو حتى عند بدء التشغيل.
- إذا لم يتجمد شريط المهام داخل هذا الوضع ، فهذا يعني أن تطبيقًا أو خدمة تابعة لجهة خارجية كانت تسبب هذه المشكلة.
- ابدأ في تمكين التطبيقات واحدًا تلو الآخر وتحقق لمعرفة أي منها يجعل المشكلة تعود.
- إذا كانت جميع التطبيقات على ما يرام ، فابدأ في تمكين الخدمات واحدة تلو الأخرى وتحقق لمعرفة أي منها يجعل المشكلة تعود.
- أبقِ الخدمة / التطبيق المشكل معطلاً أو حاول إعادة تثبيته / تحديثه.


الطريقة العاشرة: إجراء استعادة النظام
وجد بعض المستخدمين أن إجراء استعادة بسيطة إلى تاريخ عمل سابق قد أصلح مشكلتهم ولكن سيتعين عليك تحديد نقطة الاستعادة التي ستستعيدها بعناية. يوصى بإجراء هذه العملية يدويًا بدلاً من استخدام الاستعادة التلقائية. لتنفيذ هذه الخطوة ، اتبع الدليل أدناه.
- اضغط على "Windows" + "R" لفتح موجه التشغيل.
- اكتب "rstrui" واضغط على "أدخل" لفتح نافذة إدارة الاستعادة.
- انقر فوق "التالي" وحدد خيار "إظهار المزيد من نقاط الاستعادة" .
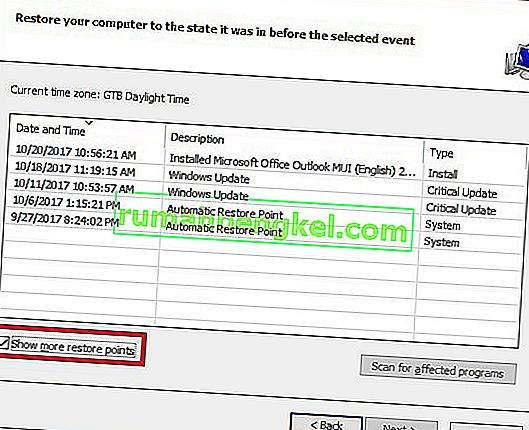
- حدد نقطة استعادة في القائمة أقدم من تاريخ بدء حدوث هذه المشكلة على جهاز الكمبيوتر الخاص بك.
- Click on “Next” again and follow the on-screen instructions to restore everything back to the date which you selected from the restore window.
- Check to see if doing so fixes the issue with the frozen taskbar.


Method 11: Toggle System Icons
It is possible in some cases that the system icon setting might be glitched on your computer due to which this issue is being triggered. Therefore, in this step, we will be toggling these icons and then we will check to see if doing so fixes the issue. For that:
- Press “Windows” + “I” to open the settings and click on the “Personalization” option.
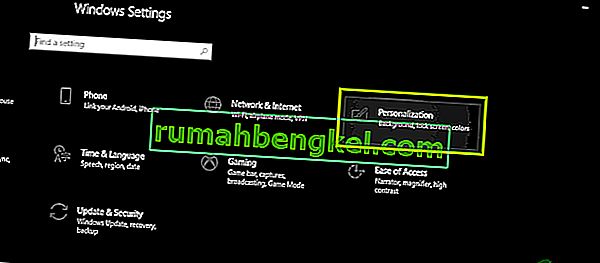
- From the left side, click on the “Taskbar” button.
- Under the “Notifications Area” heading, click on the “Turn System Icons on or off” button.
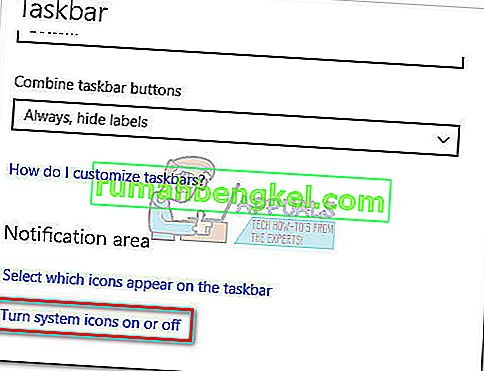
- Toggle all of the icons in the next window one by one by turning them off for a couple of seconds and then turning them back on.
- After completing this process, navigate back to the desktop by closing out of this window.
- Check to see if doing so has fixed the issue.


Method 12: Run Windows Maintenance Troubleshooter
It is possible that there might be some leftover files on your computer due to which there is a shortage of system paging memory or if there are leftover shortcuts from certain applications, that can also prevent the taskbar from functioning correctly. Therefore, in this step, we will be running the Windows Maintenance Troubleshooter and then check to see if doing so fixes this issue. For that:
- Press “Windows’ + “R” to open the Run prompt.
- Type in “Control Panel” and press “Enter” to launch the classical control panel interface.

- Click on the “View By:” option from the top and select the “Large Icons” option from the menu.
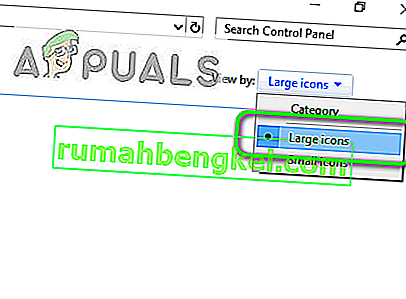
- In the next window, click on the “Troubleshooting” option and then click on the “Run Maintenance Tasks” button.
- In the window that pops up, click on the Next button, and provide administrative privileges to successfully run this task.
- Wait for the Maintenance to be completed and check to see if doing so has fixed the issue with the frozen taskbar.


Method 13: Use DDU to Perform a Clean Install
In some cases, it is possible that the Graphics Card installed on the system might have a faulty driver installed due to which this issue is being triggered. Therefore, in this step, we will be performing a Clean install of the Graphics Driver by uninstalling the Driver using DDU and then we will check to see if doing so has fixed the issue with the Taskbar. For that:
- Make sure to back up any important data before performing this step in case something goes unexpected.
- Download the DDU software from this website.
- After downloading the software, extract the zip file and open the folder where it has been extracted.
- Run the “.exe” file inside the folder and it will automatically further extract inside the same folder.
- Open the newly extracted folder and click on the “Display Driver Uninstaller.exe”.
- Click on the “Select Device Type” dropdown and select “GPU”.
- In the other dropdown, select the manufacturer of your GPU and then click on the “Clean and do not Restart” option.
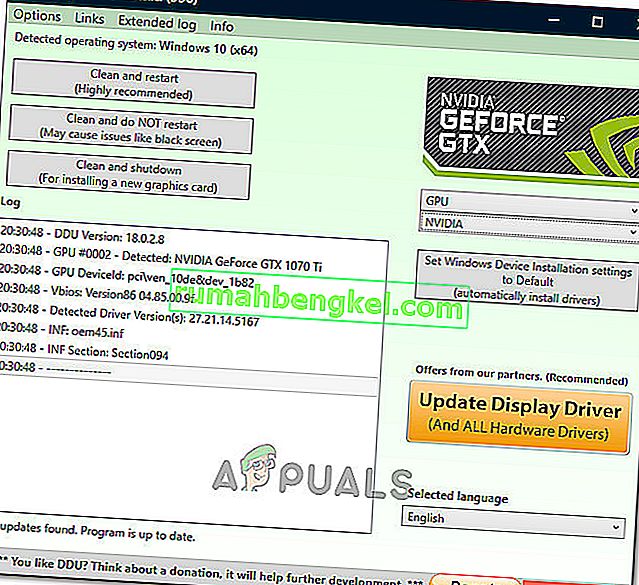
- This will uninstall the device driver for your GPU and it should automatically shift to the Microsoft Basic Visual Adapter.
- After uninstalling this software, download the GPU driver from your manufacturer’s website by specifying your exact make and model.
- Install this software on your computer and then check to see if doing so fixes the taskbar freezing issue on your computer.

Method 14: Stopping Windows Service
In some situations, it is possible that a certain Windows service might need to be stopped from the task manager. Therefore, in this step, we will be preventing it from running in the background as it has likely hanged due to which the taskbar is being frozen. In order to stop this service:
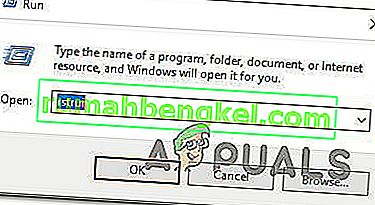
- Press “Windows’ + “R” to open the Run prompt.
- Type in “taskmgr” and press “Enter” to open the Task Manager.
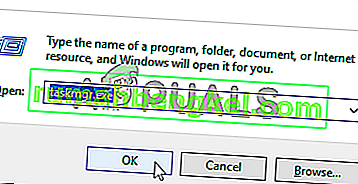
- Click on the “Processes” tab and from the list, click on the “Service Host: DCOM Server Process Launcher” service.
- Click on the “End Task” button and close out of the task manager.
- After closing out of the task manager, check to see if doing so has fixed the frozen taskbar situation.

Method 15: Stop Microsoft Edge and Remove it from Taskbar
In some situations, the default browser that comes installed with Microsoft Windows might just be the culprit behind this whole issue. If you are using another browser as your go-to default browser, you might see that using the Microsoft Edge browser causes issues with the taskbar. Therefore, in this step, we will be stopping Microsoft Edge from the Task Manager and then we will remove it from the taskbar. For that:
- Press “Windows’ + “R” to lauch the Run prompt.
- Type in “taskmgr” and press “Enter” to open the Task Manager.
- Click on the “Processes” tab and from the list, click on the “Microsoft Edge” browser.
- Click on the “End Task” button and close the task manager.
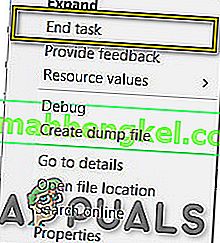
- If the Taskbar is still frozen, restart your computer and repeat this process.
- After doing so, right-click on the Microsoft Edge icon in the taskbar.
- Select the “Unpin from Taskbar” option to remove Microsoft Edge from your taskbar.
- Check to see if doing so fixes the issue.

Method 16: Remove Outdated References
It is possible that your Registry might be plagued with outdated references to an old operating system that you might’ve upgraded from. Even if you have removed the Windows.old folder from your computer, some driver and registry files might still be associated with the “Windows.old” folder which practically doesn’t exist on your computer and this misconfiguration might prevent your computer from working properly. Therefore, in this step, we will be removing it from the registry editor. For that:
- Press “Windows’ + “R’ to open the Run prompt.
- Type in “regedit” and press “Enter” to open the registry editor.

- Press “Ctrl” + “F” to open the finder and type in the “c:\windows.old” line and press “Enter” to find any registry related entries.
- Delete or remove any such entries that refer to this and run an SFC scan to check for any missing files.
- Make sure to install any missing drivers using Driver Easy and then check to see if the Frozen Taskbar issue has been fixed.

Method 17: Rollback Updates
In some situations, Windows might’ve acquired some updates that are preventing your computer from functioning properly and due to this, the taskbar feature has been broken. Therefore, in this step, we will be rolling back some recently installed updates and then we will check to see if doing so fixes the frozen taskbar issue. In order to do that:
- Press “Windows’ + “I” buttons on your keyboard to open the Windows settings.
- In the Windows Settings, click on the “Update and Security” button and from the left pane, select “Windows Update”.
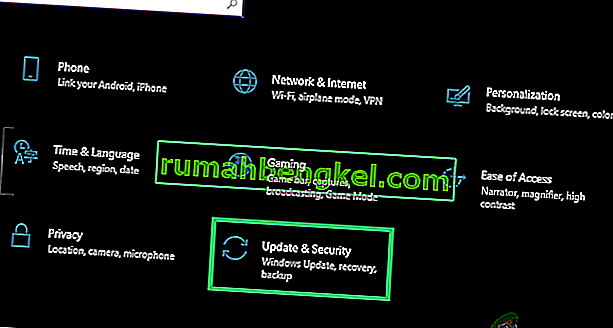
- On the next screen, select the “Update History” button and it should lead to a new window.
- In the new window, there should be an “Uninstall Updates” button and by clicking on it, a prompt should open that should enable you to be able to uninstall an update.

- Follow the on-screen instructions to be able to fully remove the update and check to see if the issue persists after doing so.


Method 18: Signing out of Account
It is possible that the Windows Taskbar is getting frozen due to a glitch during the account login. Therefore, we can test this out by simply signing out of our account and then signing back in to ensure that the account is logged in properly and that it is properly registered with the Microsoft Servers. In order to do so:
- Press “Ctrl” + “Alt” + “Del” buttons on your keyboard to open up the account options.
- Click on the “Sign out” option from the screen to log out of your account.

- Wait for Windows to completely sign you out of your account and confirm any prompts on your screen to complete the sign-out process.
- Select your account and sign back into your account from the next screen by entering your login details.
- Check to see if doing so has fixed the frozen taskbar issue on your account.

Method 19: Creating Batch File
Most people found that restarting the Windows Explorer fixed their issue but for some of them, it kept coming back after a while. Therefore, in this step, we figured out a way for the people that can solve it by restarting but all they will have to do is click on a batch file present on their desktops. For that:
- Right-click anywhere on your desktop and select the “New>” option.
- Click on the “Text Document” option and a new text document will be created on your desktop.
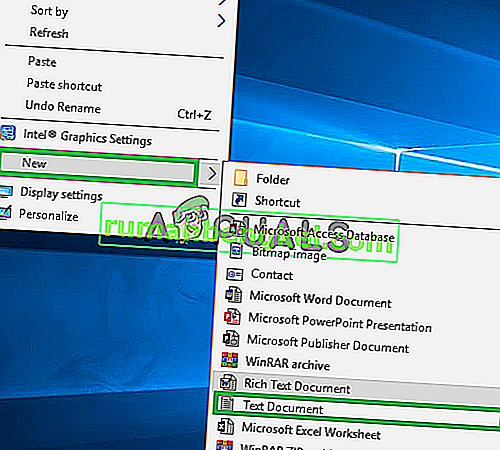
- Open this text document and paste the following lines inside of the text document.
taskkill /f /IM explorer.exe start explorer.exe exit
- Click on the “File” option at the top left of the window and select the “Save As” option.
- Enter the “TaskMRestart.bat” as the file name and select “All Files” from the “File Type” dropdown.
- Save this file on your desktop and exit out of the document.
- Now, double-clicking on this newly saved file should automatically restart File Explorer which should fix the Frozen taskbar issue within a second.
- You can just click on the file whenever the taskbar freezes and it should fix itself.

Method 20: Perform an Update
The frozen taskbar issue was a very famous topic on most Microsoft forums and apparently a lot of Microsoft officials took note of it. Therefore, it is possible that this issue might’ve been fixed for some people in recent updates released by Microsoft. Therefore, in this step, we will be checking for any available updates from Microsoft and installing them on our devices. For that:
- Press “Windows” + “I” to open the settings.
- In the settings, click on the “Update and Security” option and then select the “WindowsUpdate” button from the left side.
- In the Windows Update, click on the “Check for Updates” button and a prompt will be registered that will automatically check for any newly available updates.

- Install these updates on your computer by following the on-screen instructions and restart your computer.
- Check to see if installing these updates fixes the issue on your computer.

Method 21: Unpinning Items from Start Menu
Some people like to pin important items to the start menu for ease of access and increased productivity. However, as it stands, some Windows users have been facing the frozen taskbar issue due to these pinned items. Therefore, in this step, we will be unpinning some items from the start menu and the taskbar and then we will check to see if doing so fixes the frozen taskbar bug.
- Press the “Windows” button on your keyboard to launch the start menu.
- Inside the start menu, right-click on a tile on the right side of the start menu.
- Select the “Unpin from Start Menu” button to remove the item from the Start menu tiles.
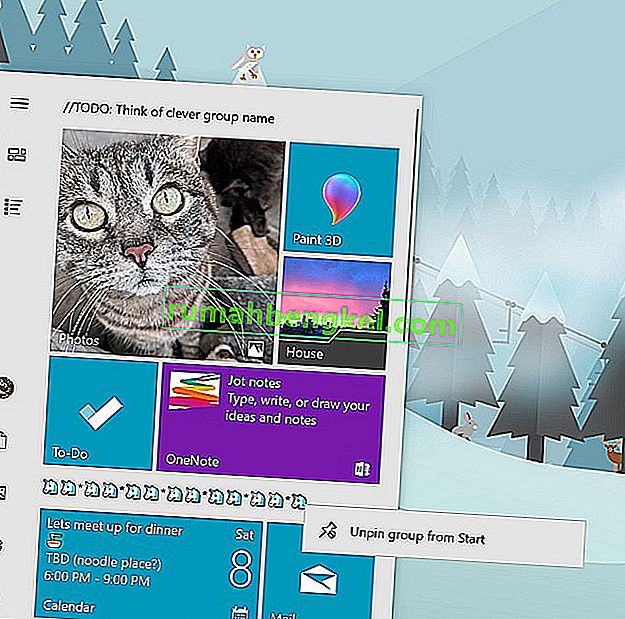
- After removing some items, check to see if the bug is fixed.
- Try removing all the items that can be removed if the bug comes back and check again.
- For a more accurate removal, try removing all the programs from the taskbar and the Start menu that try to connect to the internet, for example, Microsoft Edge, Cortana, News, etc.

Method 22: Disable Items from Bios
It is possible in some cases that the computer’s Bios has been improperly configured due to which the Windows Taskbar is getting frozen time and time again. Therefore, in this step, we will first be booting inside the Bios from which we will disable an option that should get rid of this problem if it was based around the Bios. In order to do so:
- Press the “Windows” button on your keyboard and click on the “Power Button” icon.
- Select the “Restart” option from the list and wait for your computer to prompt a restart.
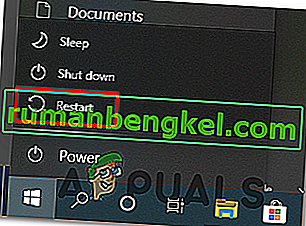
- When the computer shuts down and starts booting up, start pressing the “Del”, “F12” or “F11” key depending upon your motherboard to boot inside the computer’s bios.
- From the bios, navigate through different settings until you find the “iGPU Multi-Monitor” feature.
- Disable this feature inside the Bios and boot back into Windows.
- Check to see if disabling this feature worked and fixed the frozen taskbar error.